
Date Snickers Recipe is a delightful twist on the classic candy bar that’s both healthier and just as satisfying. Packed with natural sweetness from dates, a creamy nutty layer, and a touch of rich chocolate, this homemade treat feels indulgent without the guilt. I love making it when I want a quick, wholesome snack that still hits those sweet and salty cravings. Whether you're new to date-based desserts or a seasoned pro, you’ll find that this recipe is simple, fun, and perfect for sharing with family or friends.
Jump to:
What Makes This So Good
This Date Snickers Recipe hits the perfect harmony of chewy, creamy, sweet, and salty — all in one bite. The dates bring a natural caramel-like sweetness that pairs beautifully with the crunchy nuts and smooth nut butter layers. Plus, it’s no-bake and quick to prepare, which means more time enjoying and less time stressing.
- Big Flavor, Minimal Fuss: You get a candy bar experience made with wholesome ingredients in just minutes.
- Family-Friendly: Both kids and adults love this treat — it’s a fun weekend project that everyone can share.
- Simple Ingredients: You likely have everything already in your pantry, making it easy to whip up anytime.
- Works Any Night: Whether as an afternoon snack, dessert, or energy boost before a workout, it’s versatile and satisfying.
Ingredient Guide

Picking the right ingredients sets you on the path to Date Snickers Recipe success — and I’m here to help you make thoughtful choices you’ll love!
- Medjool Dates: These are the secret stars — juicy and soft, they blend into a luscious caramel base. Dried-out dates won’t work as well, so if yours feel stiff, soak them in warm water for 10 minutes first.
- Peanut Butter or Almond Butter: Choose natural nut butter with just nuts and a pinch of salt. It keeps the filling creamy and flavorful without added sugar.
- Chopped Nuts (Peanuts or Mixed Nuts): Freshly chopped for that satisfying crunch — fresh nuts give you that toasty, nutty aroma that lifts the whole bar.
- Dark Chocolate: Use good quality 70%+ dark chocolate for a rich, slightly bitter contrast to the sweet dates. It melts smoothly and sets firm for a satisfying snap.
- Sea Salt: A sprinkling on top brings out all the flavors brilliantly — just a little goes a long way.
Quick Reminder: Full measurements are in the recipe card below—feel free to peek as you go and tweak a little to your taste.
How to Make Date Snickers Recipe
Step 1 — Prep & Ready
Start by pitting your medjool dates if they aren’t already, and give them a quick chop so they blend more easily. Line a small pan or baking dish with parchment paper — this will help you lift out the bars later. Grab your nuts and chop them roughly to preserve that wonderful crunch you’re after. If your chocolate isn’t chopped into chunks, break it into small pieces ready for melting.
Step 2 — Cook with Confidence
Place the dates into a food processor, pulse until they form a sticky paste—it’s okay if a few small pieces remain for texture. Spread this date layer evenly in your lined dish, pressing down firmly. Next, blend your nut butter with half the chopped nuts and spread this creamy layer right over your date base—smooth it out with a spatula. Now, sprinkle the rest of your nuts on top for texture. In a heatproof bowl, melt your chocolate in short bursts in the microwave or over a double boiler until silky and smooth. Pour or spoon the chocolate evenly over the nut layer, gently shading it to cover completely. You might notice a lovely toasty nut aroma filling your kitchen—that’s when you know you’re on the right track!
Step 3 — Finish & Serve
Sprinkle a pinch of flaky sea salt across that chocolate layer while it’s still warm—it really pulls all the flavors together with a subtle pop. Transfer to the fridge and chill for at least two hours until the chocolate is fully set and the bars are firm enough to slice. When ready, lift the parchment paper to remove the slab, then cut into bars or squares. You'll notice a wonderful contrast between the chewy dates, crunchy nuts, and smooth chocolate. Serve immediately or keep them stored to enjoy later—they’re always a crowd-pleaser!
Extra Helpful Tips
From my kitchen to yours, these little pointers save time and make sure your Date Snickers Recipe turns out perfect every single time.
- Watch for This Sign: When your date paste feels too sticky to spread easily, add a tablespoon of warm water to loosen it slightly.
- Temperature Trick: Don’t overheat your chocolate—melt it gently to keep it glossy and prevent graininess.
- Prep-Ahead Option: You can make the date and nut layers a day ahead and chill them; add the chocolate topping just before serving.
- Avoid This Common Mistake: Skipping the parchment lining can make your bars stick and break apart—trust me, it’s worth the extra step.
Serve & Enjoy

Easy Enhancements
Elevate your Date Snickers Recipe by adding a few creative touches. A drizzle of melted white chocolate over the top adds a pretty contrast. Sprinkle with toasted coconut flakes or a few mini chocolate chips for extra texture. For a spicy kick, a dash of cinnamon or cayenne pepper in the nut butter layer brings a surprising warmth that pairs beautifully with the sweetness.
Tasty Pairings
Pair these bars with a cup of rich coffee or a creamy latte to create a cozy afternoon pick-me-up. For a fun snack plate, add fresh fruit like sliced apples or pears, and perhaps some Greek yogurt on the side. If you want to serve it as a dessert, a small scoop of vanilla ice cream never disappoints.
Quick Plating Tips
Cut the bars into clean squares using a warm knife to get super neat edges. Arrange them on a small wooden board or a pretty plate, sprinkle with extra chopped nuts or a pinch of sea salt, and add a few fresh berries for a pop of color. This simple plating shines without any fuss and makes your treat feel extra special.
Store, Freeze & Reheat
Fridge Storage
Keep your Date Snickers Recipe bars in an airtight container in the fridge for up to 5 days. They’ll stay perfectly chewy with that satisfying nut crunch. If you find them a bit firm after chilling, just let them sit at room temperature for a few minutes before enjoying.
Freezer Friendly?
These bars freeze wonderfully! Wrap them individually or layer separated by parchment paper in a freezer-safe container. When you’re ready, thaw overnight in the fridge. To avoid sogginess, don’t thaw at room temp for too long—cut and enjoy once softened but still cool.
Reheat Like New
If you want a warm treat, pop a bar in the microwave for 10 seconds or warm gently in a skillet on low heat just until soft. This wakes up the nut butter and chocolate without melting everything completely. It’s like a fresh-from-the-oven candy bar!
Date Snickers Recipe FAQs
Absolutely! Almonds, cashews, or mixed nuts work great and bring their own unique flavors to the bars. Just chop them roughly for the best texture.
Store them in an airtight container in the fridge for up to 5 days. For longer storage, wrap and freeze as described above to maintain freshness.
Yes! Just make sure your chocolate is dairy-free and that you use maple syrup or another vegan sweetener. The rest of the ingredients are naturally plant-based.
You can substitute nut butter with sunflower seed butter and replace nuts with seeds like pumpkin or sunflower seeds to keep that crunch without nuts.
Final Flavor Thoughts
Making this Date Snickers Recipe is always such a joy because it’s quick, comforting, and endlessly adaptable. I hope you love the balance of sweet, salty, and nutty as much as I do. If you try it, don’t forget to leave a star rating or drop a comment sharing your favorite tweaks or how you served it — I always enjoy hearing your delicious stories. Happy snacking!
Print📖 Recipe
Date Snickers Recipe

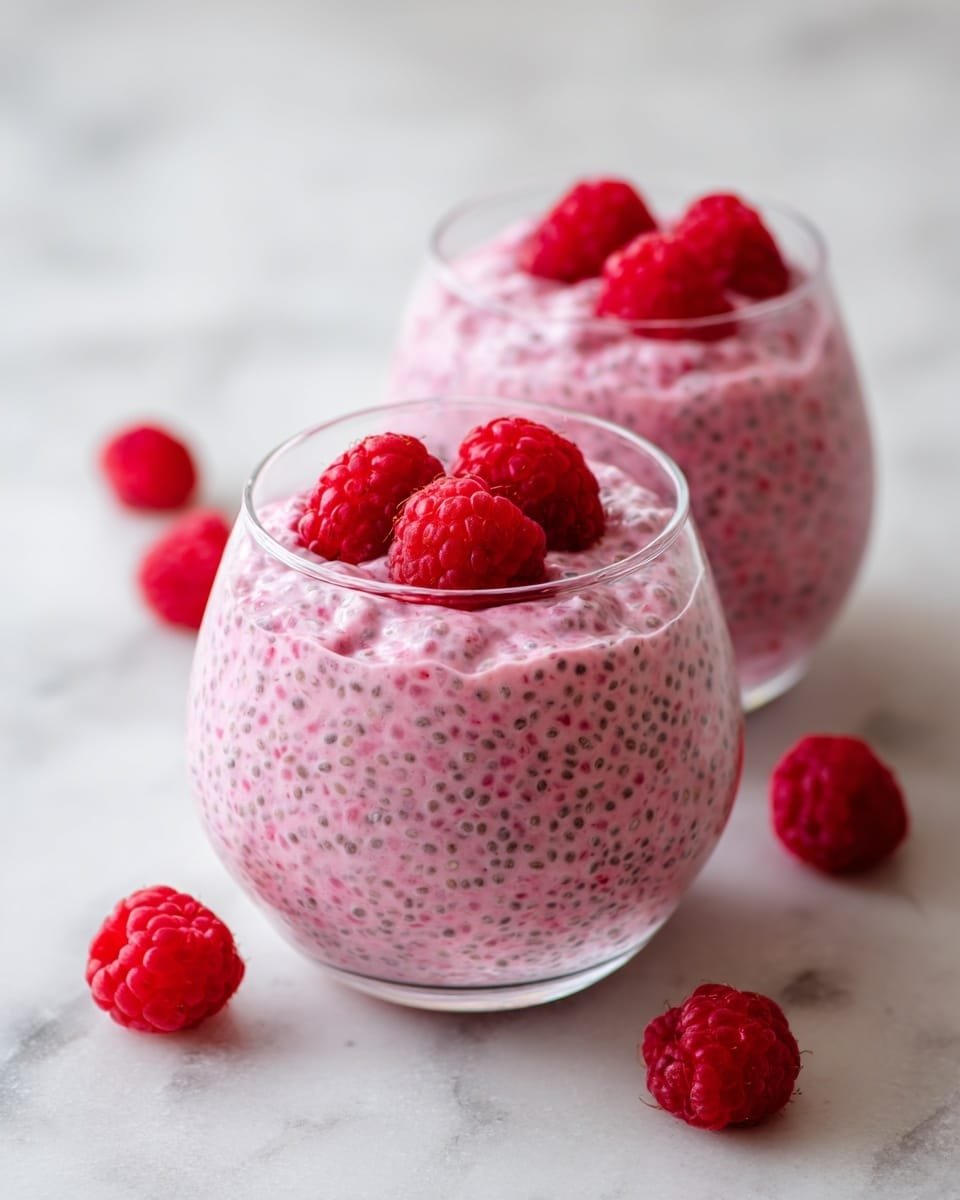
This Raspberry Chia Pudding is a creamy, naturally sweetened breakfast or snack option that combines chia seeds with almond milk and fresh raspberries. Sweetened with pure maple syrup and infused with vanilla, it's a nutritious, make-ahead treat that's perfect for a healthy lifestyle.
- Prep Time: 10 minutes
- Cook Time: 0 minutes
- Total Time: 2 hours 10 minutes
- Yield: 2 servings
- Category: Breakfast
- Method: No-Cook
- Cuisine: American
- Diet: Vegetarian
Ingredients
For the Pudding:
- ¼ cup chia seeds
- 1 cup unsweetened almond milk or milk of choice
- 2 tablespoons pure maple syrup
- ½ teaspoon vanilla extract
- ½ cup fresh or frozen raspberries plus more for topping
Optional Toppings:
- Sliced almonds or chopped nuts
- Shredded coconut
- Additional raspberries or mixed berries
- Extra drizzle of maple syrup
Instructions
- Mix the Ingredients: In a medium mixing bowl, whisk together chia seeds, almond milk, maple syrup, and vanilla extract until well combined. Stir again after 5 minutes to prevent clumping and ensure even texture.
- Mash the Raspberries: Gently mash the raspberries with a fork to release their natural juices, then stir them into the chia mixture to infuse a fresh berry flavor. For a smoother pudding, you can blend the raspberries before mixing.
- Let It Set: Cover the bowl or transfer the mixture into an airtight container and refrigerate for at least 2 hours or overnight, allowing the mixture to thicken to a pudding-like consistency. If the pudding is too thick after chilling, add a splash of milk to loosen the texture and stir well.
- Serve and Enjoy: Stir the pudding well before serving. Divide into serving cups and add your favorite toppings such as sliced almonds, shredded coconut, additional berries, or an extra drizzle of maple syrup. For added texture and flavor, consider layering with granola or yogurt.
Notes
- Chia seeds absorb liquid and thicken over time; stirring after initial mixing helps prevent clumps.
- Fresh or frozen raspberries work equally well; thaw frozen before use.
- You can substitute almond milk with any plant-based or dairy milk according to preference.
- Adjust sweetness by modifying maple syrup quantity to taste.
- Use airtight containers for storing leftover pudding to maintain freshness up to 3 days.
- For a smoother texture, blend raspberries before mixing with chia seeds.
- Pudding can be enjoyed as a breakfast, snack, or healthy dessert option.


Leave a Reply