
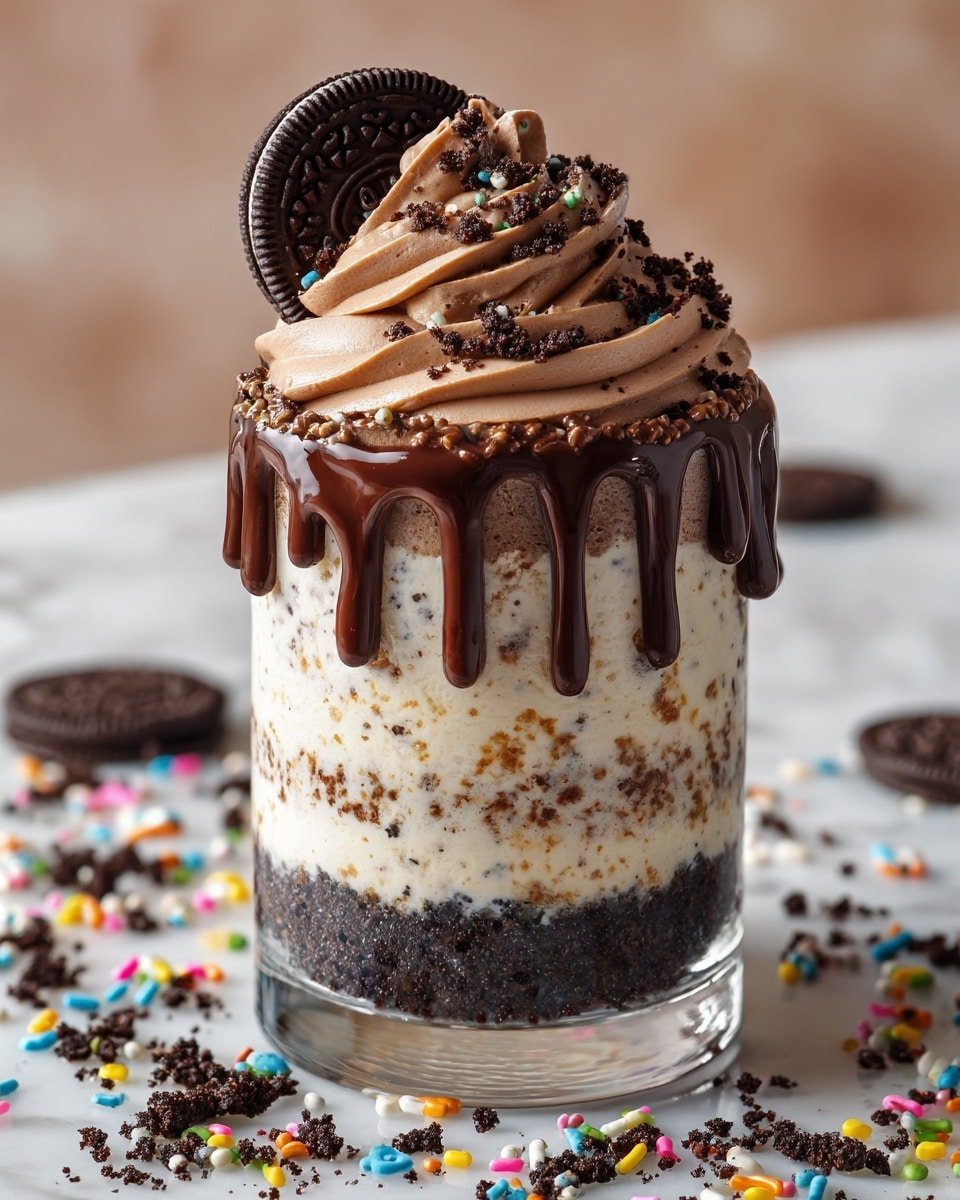
Fun Graveyard Dirt Cake Cups Recipe is such a delightful and spooky treat perfect for Halloween parties or any fun get-together. Imagine creamy chocolate pudding layered with crunchy Oreo crumbs, all nestled in individual cups that look like little dirt mounds topped with witty "RIP" cookies and cute ghost candies. It's the kind of dessert that brings smiles from both kids and adults, especially when you see those creepy, yet adorable Halloween decorations on top. If you love desserts that are playful and packed with layers of texture and flavor, you’re going to really enjoy making and sharing this.

Jump to:
What Makes This So Good
This Fun Graveyard Dirt Cake Cups Recipe brings together the perfect balance of creamy, crunchy, and chocolatey goodness with a fun Halloween twist. It’s impressively quick to prepare yet feels like a special homemade treat that everyone will remember. The layers mimic the look of fresh dirt with a rich, velvety pudding that’s just the right level of sweet without being overpowering. You’ll appreciate how this recipe is straightforward enough for even dessert novices to nail with ease, making it a stress-free way to impress guests or delight your family.
- Big Flavor, Minimal Fuss: Combining instant pudding with Oreo crumbs and chocolate syrup gives you rich, intense chocolate flavor without complicated cooking steps.
- Family-Friendly: Kids love assembling and decorating their own dirt cups, turning this into a fun activity and dessert all in one.
- Simple Ingredients: Pantry staples like Oreos, pudding mix, and whipped topping make this recipe very accessible.
- Works Any Night: Perfect for Halloween, but also great for anytime you want a quick, festive sweet treat.
Ingredient Guide

Let’s talk about picking and prepping your ingredients to get the most from this Fun Graveyard Dirt Cake Cups Recipe. Choosing the right Oreo cookies and pudding makes a big difference in flavor and texture, and I’ll share easy swaps if you’re out of anything. These tips will help you feel confident before you dive into the assembly.
- Oreo Cookies: Use the classic family-size Oreo packages for plenty of crumbs; make sure to get the original kind with cream filling for that perfect dirt texture and sweetness.
- Chocolate Syrup: Go for a thick, high-quality chocolate syrup—this really boosts the richness in the pudding and the crumbs.
- Instant Chocolate Pudding Mix: Brands like Jell-O work beautifully and set up fast, giving you a creamy, stable filling every time.
- Whipped Topping: Use thawed whipped topping to fold into the pudding for a light but luscious consistency—homemade whipped cream can be substituted if you prefer.
- Decorations: Black decorating icing is ideal for those spooky "RIP" inscriptions, while Milano cookies make great gravestones; mini pumpkin candies and ghost-shaped marshmallows add cute, festive flair.
Quick Reminder: Full measurements and exact details are provided in the recipe card below—this guide gets you prepped to success!
How to Make Fun Graveyard Dirt Cake Cups Recipe
Step 1 — Prep & Ready
First things first, break up those Oreo cookies into fine crumbs using a food processor—it takes just a few quick pulses to get a beautiful, dirt-like texture. No processor? No worries! Just put them in a large zip-top bag and crush them with a rolling pin. Also, make sure the whipped topping is fully thawed for that perfect creamy pudding mix later on. You’ll notice the crumbs have a nice mix of cookie and cream, which is key for extra richness.
Step 2 — Cook with Confidence
Now whisk together your cold whole milk and instant chocolate pudding mix until it thickens—this usually takes about 2 minutes of vigorous stirring. A quick tip: cold milk helps the pudding set up faster and gives a smoother texture. Then gently fold in your whipped topping; be gentle so you keep it light and fluffy without streaks. Drizzle half of your chocolate syrup into this mixture and swirl it around a bit so you get beautiful streaks of luscious chocolate running through. Pop this in the fridge while you prepare the rest.
Step 3 — Finish & Serve
Assembling these Fun Graveyard Dirt Cake Cups Recipe layers is truly where the magic happens. Start with a couple tablespoons of Oreo crumbs at the bottom of each serving cup. Spoon on a layer of your rich chocolate pudding mixture, then repeat the crumb and pudding layers before topping with a final sprinkle of dry Oreo crumbs. To make it feel real, gently tap the cups between layers to settle everything nicely. For that “freshly dug dirt” effect, mix the remaining crumbs with the last half cup of chocolate syrup until clumpy and moistened. This goes on top for the best textural contrast.
Extra Helpful Tips
I’ve made these Fun Graveyard Dirt Cake Cups Recipe many times, and a few little tricks make all the difference. Decorating is half the fun, so let your imagination run wild! The most satisfying moment is when you see those ‘RIP’ cookies standing proud among the dirt layers, making every bite feel like a special treat straight from the spooky graveyard.
- Watch for This Sign: Your pudding should be thick but still soft enough to easily spoon—don’t overwhisk or it might turn stiff.
- Temperature Trick: Using cold milk and chilled whipped topping ensures the pudding sets up faster and tastes smoother.
- Prep-Ahead Option: You can make the pudding and crumb mixture a day ahead and assemble just before serving for fresher texture.
- Avoid This Common Mistake: Don’t skip tapping the cups as you layer—it prevents air pockets and keeps the layers beautifully even.
Serve & Enjoy
Easy Enhancements
If you want to add a little extra zing to your Fun Graveyard Dirt Cake Cups Recipe, try sprinkling a touch of cinnamon or chili powder on the crumb layers for a surprising warm kick. Adding some crushed toffee bits or mini chocolate chips can bring even more crunch. For a fresh note, a few mint leaves or edible flowers scattered around the serving tray make a festive presentation. And, of course, you can always jazz up your gravestone cookies with colorful icing or glittery sugar for extra flair.
Tasty Pairings
These cups go wonderfully with simple beverages like a chilled glass of milk, hot cocoa, or even a mild coffee if you want an adult-friendly pairing. For a more festive occasion, a sparkling cranberry spritzer or a dark chocolate stout complements the flavors beautifully. Pair with some salty popcorn or spiced nuts to balance the sweetness and keep things interesting throughout the party.
Quick Plating Tips
Presentation is surprisingly easy here—just arrange your dirt cups on a rustic wooden tray or black platter to amplify the spooky vibe. Sprinkle a few loose Oreo crumbs around the cups to mimic spilled dirt and maybe scatter some fake autumn leaves or plastic spiders for added fun. Using clear cups lets everyone admire the layers, but mini pumpkin-shaped bowls or black ramekins also look fantastic if you want to mix it up.
Store, Freeze & Reheat
Fridge Storage
This Fun Graveyard Dirt Cake Cups Recipe stores beautifully in your fridge for up to 3 days. Use an airtight container or cover the cups tightly with plastic wrap to keep the creamy pudding from drying out. You’ll notice the Oreo crumbs soften slightly over time, which actually makes the dirt layers taste more like moist cake, so it’s quite pleasant even the next day.
Freezer Friendly?
I don’t recommend freezing this dessert, as the pudding texture changes and the Oreo crumbs can become soggy or grainy after thawing. The whipped topping and pudding don’t freeze well together, so the best bet is to enjoy these fresh or refrigerated.
Reheat Like New
Since this dessert is best served chilled, reheating isn’t really necessary. If you’ve stored it in the fridge and want to soften it slightly, just let the cups sit at room temperature for about 15 minutes before serving. This brings out the creamy texture without melting the whipped topping completely. Avoid microwaving as it can make the layers separate or become watery.
Fun Graveyard Dirt Cake Cups Recipe FAQs
Absolutely! Swap out the whole milk for almond or oat milk and use a dairy-free whipped topping and pudding mix that suits your diet. The flavor and texture won't be quite the same but still very tasty and fun.
This recipe yields about 18 individual cups, perfect for a crowd or Halloween party. You can easily halve the ingredients if you want a smaller batch.
Using a food processor is your best bet for evenly fine crumbs. If you don't have one, placing the Oreos in a sealed bag and crushing them with a rolling pin works great — just aim for a uniform crumb size without large chunks.
Yes, you can mix the pudding and Oreo crumb components a day ahead and assemble the cups on the day you plan to serve. Just keep everything refrigerated to maintain freshness and texture.
Final Flavor Thoughts
I hope this Fun Graveyard Dirt Cake Cups Recipe inspires you to bring a little spooky sweetness into your kitchen this season. It’s a dessert that’s as enjoyable to make as it is to eat, with plenty of room to customize and get creative decorating. If you try it, please come back and leave a star rating or tell me about your favorite decorations and twists—I love hearing how friends put their own spin on it!
Print📖 Recipe
Fun Graveyard Dirt Cake Cups Recipe

Fun Graveyard Dirt Cake Cups are a spooky and delicious Halloween dessert featuring layers of Oreo cookie crumbs, creamy chocolate pudding, and whipped topping. Decorated with Halloween-themed treats like Milano cookie gravestones, ghost marshmallows, and pumpkin candies, these cups are perfect for parties and festive celebrations.
- Prep Time: 25 minutes
- Cook Time: 0 minutes
- Total Time: 25 minutes
- Yield: 18 servings
- Category: Dessert
- Method: No-Cook
- Cuisine: American
Ingredients
For the Crumb Layers:
- 2 packages family size Oreo cookies (19.1 oz each)
- 1 cup chocolate syrup (divided, use good quality for richer flavor)
For the Pudding Filling:
- 16 oz whipped topping, thawed
- 2 packages instant chocolate pudding mix (3.9 oz each, Jell-O brand recommended)
- 4 cups whole milk (cold)
For the Spooky Decorations:
- Black cookie decorating icing (Betty Crocker recommended)
- Milano cookies
- Mini pumpkin-shaped candies
- Assorted Halloween-themed sprinkles
- Ghost-shaped marshmallow treats (Peeps)
Instructions
- Prepare Oreo Cookie Crumbs: Place the Oreo cookies into a food processor in batches and process until they form fine crumbs. Transfer all crumbs into a large bowl and set aside for assembly.
- Make the Chocolate Pudding Mixture: In a large bowl, whisk together the cold whole milk and instant chocolate pudding mix for about 2 minutes until thickened. Gently fold in the thawed whipped topping until no streaks remain, creating a creamy pudding mixture.
- Add Chocolate Syrup to Pudding: Drizzle ½ cup of chocolate syrup into the pudding mixture and gently swirl a few times for a streaky effect. Chill the pudding mixture in the fridge until ready to assemble.
- Assemble the Individual Graveyard Cups: Arrange 18 serving cups (about 9 ounces each). Add 2 tablespoons of Oreo crumbs to the bottom of each cup, spoon under ¼ cup of pudding mixture over crumbs. Repeat with another 2 tablespoons Oreo crumb layer, then the remaining pudding. Top each cup with 1 tablespoon of Oreo crumbs. Tap gently between layers to even them out.
- Make ‘Fresh Dirt’ Cookie Crumbs: Stir the remaining ½ cup chocolate syrup into leftover Oreo crumbs until clumpy and moist in appearance. Set aside for decoration.
- Decorate the Graveyard Cups: Use black cookie decorating icing to write "RIP" or spooky sayings on Milano cookies. Press them into the tops of cups as gravestones. Add ghost marshmallows, mini pumpkin candies, and Halloween sprinkles. Top with the clumpy ‘fresh dirt’ crumbs to resemble freshly dug earth. Get creative with designs for a fun effect.
- Chill and Serve: Refrigerate the decorated graveyard cups until ready to serve or enjoy immediately as a festive spooky treat.
Notes
- Use cold milk for best pudding consistency.
- Chilling the pudding and assembled cups improves texture and flavor.
- You can decorate half the cups for variety if desired.
- Tap cups gently between layers for neat layering.
- Use good quality chocolate syrup for richer flavor.

Leave a Reply