
Japanese Katsu Bowls Recipe is one of those comforting meals that feels like a big warm hug on a plate. It combines crispy, golden-breaded cutlets with fluffy rice and savory sauce, creating a balance of textures and flavors that's hard to beat. Whether you’re craving a satisfying dinner after a long day or a weekend treat to impress your family and friends, this recipe has you covered. Plus, it’s perfect for anyone who loves a little crunch with their tender protein and a bowl full of flavor-packed goodness.
Jump to:
What Makes This So Good
The magic of this Japanese Katsu Bowls Recipe lies in its perfect combination of textures and flavors: the crispy, panko-coated cutlets that snap satisfyingly with every bite, the steaming bed of tender rice underneath, and a savory-sweet sauce that ties everything together beautifully.
- Big Flavor, Minimal Fuss: You get restaurant-quality crispiness and umami depth without complicated techniques or hard-to-find ingredients.
- Family-Friendly: This dish appeals to both adults and kids with its comforting, familiar textures and flavors.
- Simple Ingredients: Basic pantry staples and easy-to-source fresh items make this perfect for a quick weeknight meal.
- Works Any Night: Whether it's a busy weekday or a relaxed weekend, you can whip this up with confidence and enjoy a delicious meal.
Ingredient Guide

Choosing the right ingredients makes all the difference when preparing your Japanese Katsu Bowls Recipe. From the perfect rice to the crispest cutlets, here’s what to look for and some handy swaps if needed.
- Pork or Chicken Cutlets: I love using pork loin for richness, but chicken breast is a lighter option. Choose thin, even slices to help them cook through evenly.
- Panko Breadcrumbs: These Japanese-style breadcrumbs give you that signature crispy coating. If you can only find regular breadcrumbs, toasting them first improves crunch.
- Cooked Rice: Short-grain or sushi rice is ideal for its sticky texture that holds the bowl together. Make sure it’s freshly cooked and still warm.
- Katsu Sauce: Ready-made sauces work great, but mixing Worcestershire sauce, ketchup, and soy sauce makes a quick homemade alternative with a perfect balance of tangy and sweet.
- Eggs and Flour: Standard pantry staples that help your breading stick perfectly and create that golden crust.
Quick Reminder: Full measurements and timing details are in the recipe card below, so you won’t miss a step!
How to Make Japanese Katsu Bowls Recipe
Step 1 — Prep & Ready
Start by patting your cutlets dry with paper towels; moisture can make the coating soggy instead of crisp. If needed, pound them gently to an even thickness of about ½ inch for consistent cooking. Set out three shallow dishes: one with flour, one beaten eggs, and one with your panko breadcrumbs. Don’t forget to season the flour generously with salt and pepper—this little step seasons the meat beautifully. Finally, preheat your oil to medium-high heat; you’ll know it’s ready when a breadcrumb dropped in sizzles and turns golden in under a minute.
Step 2 — Cook with Confidence
Coat each cutlet first in flour, shaking off excess; then dip into the egg wash, followed by a generous press into the panko crumbs. The crumbs should stick nicely without falling off—that’s what you want. Carefully lower them into the hot oil and cook about 3-4 minutes per side, or until you see that gorgeous deep golden crust forming and you can smell that irresistible toasty aroma. Flip gently to avoid dislodging the coating. I always find this part so rewarding because those crispy edges tell me I’m almost there!
Step 3 — Finish & Serve
Once cooked, transfer the cutlets to a plate lined with paper towels to soak up any excess oil—this keeps each bite crisp rather than greasy. Slice the cutlets into strips for easy eating and arrange them atop fluffy bowls of steaming rice. Ladle on your rich katsu sauce; the dark, tangy liquid seeps into the crispy coating for maximum flavor. A handful of thinly sliced green onions or a few pickled veggies add freshness and color, making the bowl as inviting to the eyes as to the palate.
Extra Helpful Tips
I’ve found a few little tricks over the years that turn this Japanese Katsu Bowls Recipe from great to unforgettable. Don’t worry if you’re new to breading meat this way—these tips will steer you toward crispy perfection every time.
- Watch for This Sign: The oil should ripple around the cutlet edges as soon as it hits the pan—this means it's hot enough for a crisp crust.
- Temperature Trick: Keep the oil between 340°F and 350°F; too hot burns crumbs, too cool makes them soggy.
- Prep-Ahead Option: You can bread the cutlets and refrigerate them for up to 30 minutes before frying to help the coating set better.
- Avoid This Common Mistake: Don’t overcrowd the pan; frying too many cutlets at once drops the oil temperature and leads to greasy results.
Serve & Enjoy

Easy Enhancements
Add a little extra love to your Japanese Katsu Bowls Recipe by mixing in fresh herbs like cilantro or shiso leaves for brightness. A drizzle of spicy mayo or a sprinkle of toasted sesame seeds can take your bowl to the next level. If you’re feeling adventurous, toss in quick-pickled cucumbers for a crisp, tangy contrast that balances the richness wonderfully.
Tasty Pairings
Serve these bowls with a side of steamed or sautéed veggies like bok choy, edamame, or a simple cucumber salad for refreshing crunch. Miso soup or a light green tea complements the flavors beautifully, making the meal feel truly authentic and satisfying from start to finish.
Quick Plating Tips
For pretty plating in minutes, arrange the sliced cutlets on one half of the bowl, mound the rice on the other, and drizzle sauce artistically over the top. A sprinkle of nori strips, sliced scallions, or chili flakes adds color and invites your guests to dig in. Nothing beats the satisfaction of a bowl that looks as good as it tastes!
Store, Freeze & Reheat
Fridge Storage
You can store leftover Japanese Katsu Bowls Recipe components separately in airtight containers for up to 3 days in the fridge. Keep your cutlets and rice apart to maintain the crispy texture; the sauce can be reheated gently alongside. You may notice the cutlets soften a bit, but reheating can bring back some crunch.
Freezer Friendly?
Frying and freezing cutlets is doable, but keep in mind they might lose some crispness after thawing. Freeze the cooked, cooled cutlets tightly wrapped. To thaw, place them in the fridge overnight and refresh by reheating in a hot skillet instead of the microwave to bring back crisp edges.
Reheat Like New
For a deliciously crispy reheat of your Japanese Katsu Bowls Recipe, heat a little oil in a skillet over medium heat and warm the cutlets a few minutes on each side. Warm the rice separately. This method keeps the cutlets juicy inside with a crisp outside—way better than microwaving, which can make them soggy.
Japanese Katsu Bowls Recipe FAQs
Absolutely! Swap regular flour with a gluten-free all-purpose blend, and use gluten-free panko or crushed rice crackers for that crispy coating. Also, make sure your katsu sauce is gluten-free or prepare a homemade version using tamari instead of soy sauce.
Pork loin or tenderloin is traditional and very flavorful, but you can easily use chicken breast for a lighter option or even firm tofu for a vegetarian twist. Just adjust cooking times accordingly.
Drain the fried cutlets on a wire rack instead of paper towels to avoid steam making the breading soggy, and serve as soon as possible. If holding, keep them in a warm oven to maintain crispness.
You can! Coat your cutlets the same way and bake them on a wire rack at 425°F (220°C) for about 15-20 minutes, flipping halfway. The texture won’t be quite as crispy as frying, but still delicious and less oily.
Final Flavor Thoughts
Making this Japanese Katsu Bowls Recipe has always brought me joy, whether I’m cooking for my family or when I just want something cozy and delicious. I’d love to hear how your bowls turn out—don’t be shy about dropping a star rating or a comment below! Next time, try swapping in chicken or adding a fried egg on top for an easy twist. Enjoy every crunchy, saucy bite!
Print📖 Recipe
Japanese Katsu Bowls Recipe

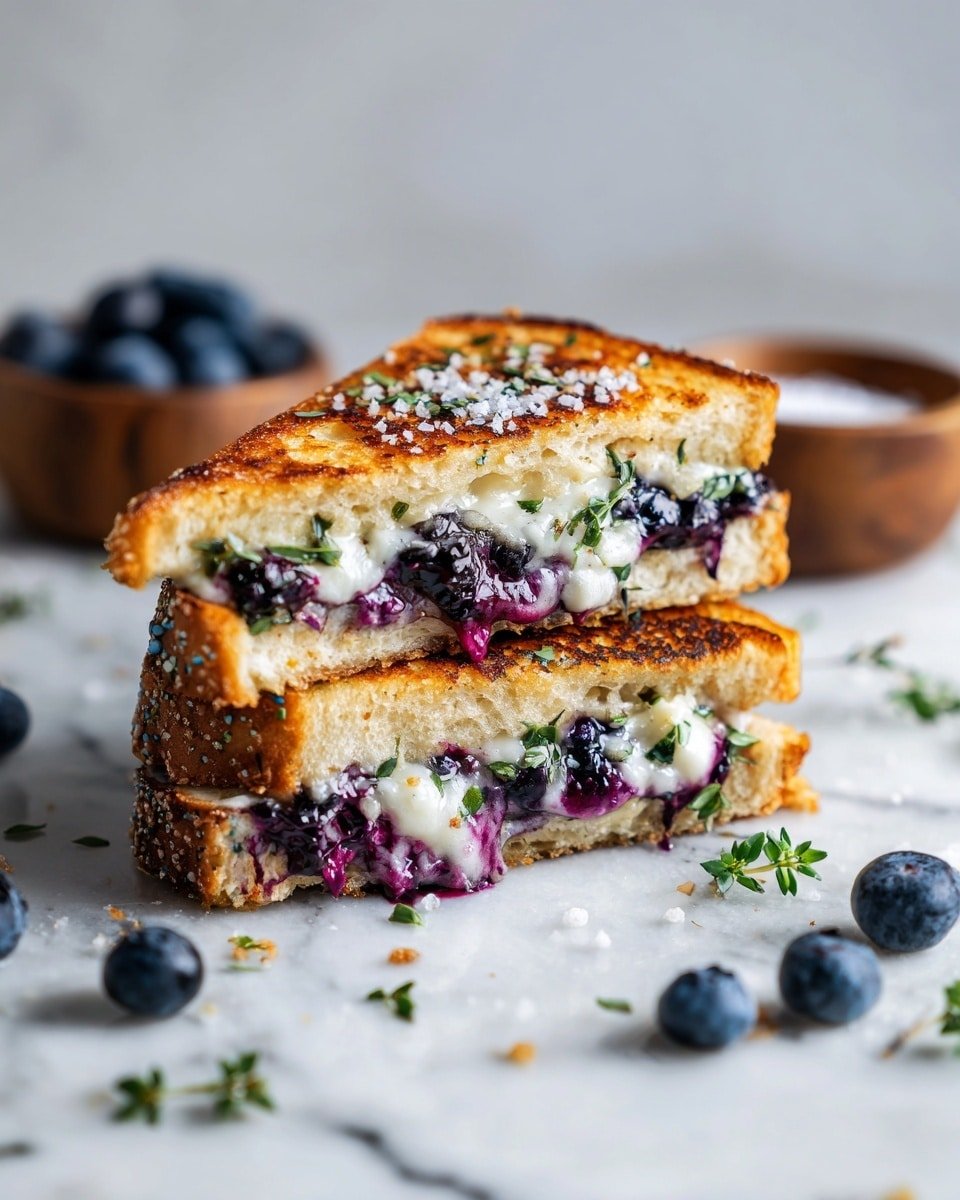
Crispy Blueberry Grilled Cheese is a delightful twist on the classic sandwich, combining a tangy homemade blueberry lemon thyme jam with melted mozzarella and white cheddar cheeses between slices of toasted sourdough bread. This sandwich offers a perfect balance of sweet, tangy, and savory flavors with a crispy golden crust and gooey cheese inside, ideal for a comforting lunch or snack.
- Prep Time: 15 minutes
- Cook Time: 15 minutes
- Total Time: 30 minutes
- Yield: 4 sandwiches
- Category: Sandwich
- Method: Stovetop
- Cuisine: American
Ingredients
Blueberry Lemon Thyme Jam
- 1 pint fresh blueberries
- ¼ cup white sugar
- Juice of 1 lemon
- 1 small bundle lemon thyme, tied with kitchen twine
Sandwiches
- 8 slices sourdough bread, ¼-inch thick
- 4 oz mozzarella cheese, shredded
- 4 oz white cheddar cheese, grated
- 4 tablespoons unsalted butter (such as Kerrygold)
- Flaky sea salt (for finishing)
Instructions
- Prepare the Blueberry Lemon Thyme Jam: In a 2-quart saucepan over medium-high heat, combine the fresh blueberries, white sugar, lemon juice, and bundled lemon thyme. Bring the mixture to a boil, then reduce heat to medium-low and simmer for about 10 minutes. Lower the heat further to low and continue simmering for another 10 minutes, stirring frequently until the jam thickens. Remove and discard the lemon thyme bundle and allow the jam to cool for 10 minutes before use.
- Assemble the Sandwiches: Lay out 4 slices of sourdough bread. Spread a generous amount of the cooled blueberry lemon thyme jam evenly over each slice. Sprinkle shredded white cheddar and mozzarella cheeses over the jam. Top with the remaining 4 bread slices to complete the sandwiches, pressing gently to secure them.
- Grill the Sandwiches: Heat a 12-inch cast iron skillet over medium heat and add 2 tablespoons of butter, allowing it to melt completely. Place two assembled sandwiches into the skillet and cover with a lid. Cook for 2-3 minutes until the bottom is golden brown, then carefully flip and cook for an additional 2-3 minutes until the other side is golden and the cheese has fully melted. Repeat with remaining butter and sandwiches. Optionally, finish with a sprinkle of flaky sea salt before serving.
Notes
- Use a cast iron skillet for even heating and a perfectly crispy crust.
- The lemon thyme bundle enhances the jam's flavor but is removed before using the jam.
- Be generous with the blueberry jam for a sweet and tangy contrast to the melted cheeses.
- For best results, use fresh, quality sourdough bread sliced about ¼ inch thick.
- Butter the skillet rather than the bread for a crispier texture and less oily sandwich.


Leave a Reply