
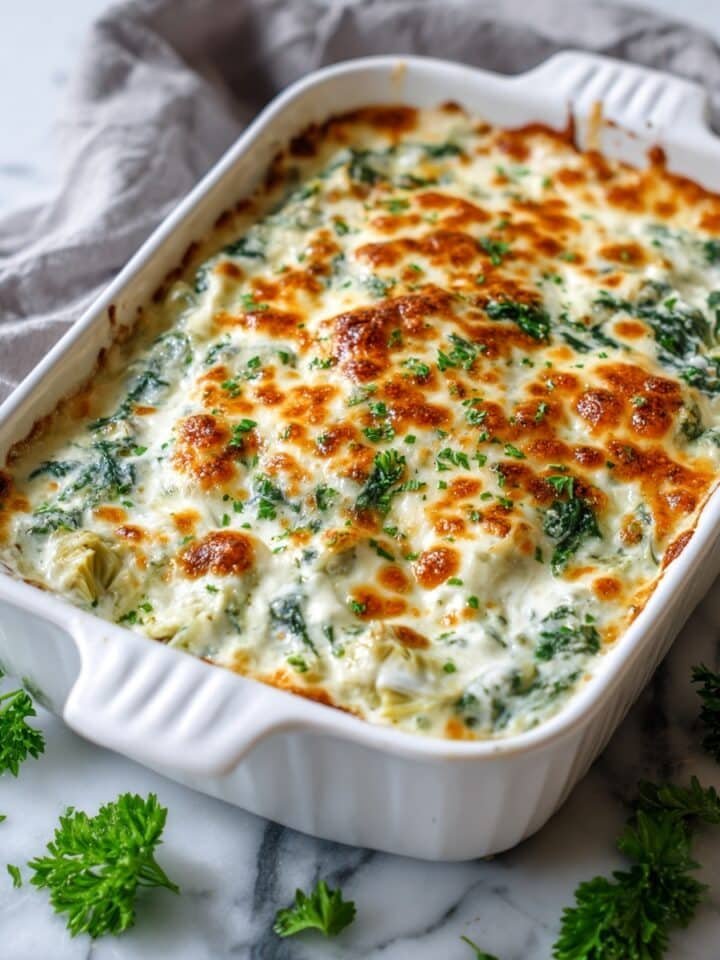
Mushroom Shallot and Herbed Goat Cheese Tarts Recipe is one of those delightful bites that makes you feel like you’re treating yourself, even on a busy weeknight. The combination of earthy mushrooms, sweet shallots, and tangy, herb-infused goat cheese tucked into crispy pastry is just irresistible. Whether you’re hosting a casual dinner or simply want to enjoy a cozy moment with something flavorful and comforting, this recipe will quickly become a go-to. If you love savory tarts with a perfect balance of creaminess and umami, you’re in for a real treat here.

Jump to:
What Makes This So Good
This Mushroom Shallot and Herbed Goat Cheese Tarts Recipe stands out because it combines rich, savory flavors with a flaky, buttery crust that bakes up golden and crisp every time. The creamy goat cheese melts into the earthy mushrooms and caramelized shallots, creating a cozy, irresistible filling.
- Big Flavor, Minimal Fuss: You don’t need complicated techniques or rare ingredients; it’s all about letting fresh produce and quality cheese shine.
- Family-Friendly: These tarts make an excellent snack or a light meal that everyone tends to love, even picky eaters.
- Simple Ingredients: Mushrooms, shallots, goat cheese, and herbs—easy to find and easy to prepare.
- Works Any Night: Whether you’re meal-prepping or throwing a last-minute get-together, these tarts are ready in under an hour and look stunning on the table.
Ingredient Guide

Picking the freshest ingredients is key to making sure your Mushroom Shallot and Herbed Goat Cheese Tarts Recipe turns out perfectly flavorful. Here’s my take on how to select and prep each one for the best results.
- Mushrooms: Choose cremini, baby Bella, or even a mix of wild mushrooms for deep, earthy flavor. Clean gently with a damp cloth; avoid soaking so they don’t get soggy.
- Shallots: Look for firm, dry shallots without soft spots. Their natural sweetness is essential to balance the tangy cheese.
- Herbed Goat Cheese: You can buy herbed goat cheese or mix plain goat cheese with fresh chopped herbs like thyme, rosemary, or chives at home for freshness.
- Pastry Dough: Store-bought puff pastry works wonderfully here, saving time while delivering that flaky, buttery crust you want.
Quick Reminder: Full measurements and specifics are right down below in the recipe card so you can follow along without missing a beat.
How to Make Mushroom Shallot and Herbed Goat Cheese Tarts Recipe
Step 1 — Prep & Ready
Start by preheating your oven to 400°F (200°C) so it’s nice and hot when you’re ready to bake. While it warms up, finely slice about 8 ounces of mushrooms and thinly slice 2 medium shallots. You’ll want to sauté these until the shallots become soft and sweet and the mushrooms give off a beautiful, nutty aroma. This step preps the filling with great flavor depth before adding the herbed goat cheese.
Step 2 — Cook with Confidence
Heat a splash of olive oil over medium heat in a skillet. Toss in the shallots first—sauté them gently until translucent and starting to caramelize, about 5 minutes. Then, add the mushrooms and cook for another 6-8 minutes until they shrink and develop those lovely brown edges. Season with salt and pepper. When the mixture is ready, remove from heat and let it cool slightly before folding in your herbed goat cheese. This ensures the cheese stays creamy without melting away completely.
Step 3 — Finish & Serve
Roll out your puff pastry on a lightly floured surface and cut it into squares or circles about 4-5 inches wide. Spoon a generous dollop of the mushroom, shallot, and goat cheese mixture onto each. Fold the edges up just a bit or score decorative patterns—you’ll love seeing them puff up golden and crisp. Bake for 18-22 minutes until the crust is deeply golden and flaky. Let the tarts cool just a minute before serving so the cheese sets but still feels soft and silky.
Extra Helpful Tips
I’ve found these tips really help nail the texture and flavor every time you make this Mushroom Shallot and Herbed Goat Cheese Tarts Recipe. Don’t worry if it’s your first go—these pointers can save you some common pitfalls and take your tarts from good to truly irresistible.
- Watch for This Sign: When your mushrooms have given off their moisture and start browning at the edges, that's your cue to remove them from heat to preserve that deep flavor without sogginess.
- Temperature Trick: Chill your puff pastry before baking. Cold dough puffs up better, creating those flaky layers we all adore.
- Prep-Ahead Option: You can make the mushroom and shallot filling a day ahead and store it refrigerated—just add the goat cheese right before assembling.
- Avoid This Common Mistake: Don’t overload the pastry with filling; too much moisture can make the crust soggy rather than crisp.
Serve & Enjoy

Easy Enhancements
To jazz up your Mushroom Shallot and Herbed Goat Cheese Tarts Recipe even more, try sprinkling chopped fresh thyme or a pinch of crushed red pepper flakes over the filling before baking for a gentle herbal or spicy kick. A drizzle of balsamic glaze or a touch of honey right after baking adds a lovely balance to the tanginess of the goat cheese as well.
Tasty Pairings
These tarts pair beautifully with a crisp green salad dressed in lemon vinaigrette for freshness, or alongside a warm bowl of butternut squash soup to keep things cozy. For drinks, a light white wine like Sauvignon Blanc or a sparkling water with a splash of citrus makes a refreshing complement.
Quick Plating Tips
Serve your tarts on a wooden board or pretty platter and scatter some fresh herb leaves—like parsley or thyme—around for a pop of color. A few thin slices of radish or microgreens on top give a fresh crunch and make the presentation look effortlessly special.
Store, Freeze & Reheat
Fridge Storage
Store any leftovers in an airtight container in the fridge for up to 3 days. You’ll notice the crust softens a bit, but a quick reheat in the oven will help bring back some crispiness. The flavor stays just as delightful, making these tarts great for next-day snacks or lunches.
Freezer Friendly?
While you can freeze the assembled tarts uncooked, it’s best to bake them fresh after thawing to maintain that crispy crust. Freeze them flat on a tray first, then wrap individually to prevent sticking. When ready, thaw overnight in the fridge before baking as directed.
Reheat Like New
To keep your Mushroom Shallot and Herbed Goat Cheese Tarts Recipe tasting fresh, reheat in a 350°F oven for about 8-10 minutes. This revives the crust’s crispiness and melts the cheese just a bit. Avoid the microwave if you can; it tends to make the pastry soggy and the filling rubbery.
Mushroom Shallot and Herbed Goat Cheese Tarts Recipe FAQs
Absolutely! Cream cheese or ricotta mixed with some chopped herbs can be a great substitute, though goat cheese provides that distinct tanginess that's hard to beat.
Yes! This Mushroom Shallot and Herbed Goat Cheese Tarts Recipe is naturally vegetarian as long as your pastry dough doesn’t contain animal fats—always check the label if you’re unsure.
Definitely. The mushroom and shallot filling can be made a day in advance and stored in the fridge. Mix in the goat cheese just before assembling the tarts to keep the cheese fresh and creamy.
Keep your puff pastry cold and don't overwork it. Also, bake in a fully preheated oven so the layers puff up quickly and get beautiful golden color.
Final Flavor Thoughts
Making this Mushroom Shallot and Herbed Goat Cheese Tarts Recipe reminded me just how satisfying simple ingredients can be with a bit of love and the right technique. If you try it, don’t forget to leave a star rating and share your favorite herb combo or tweak in the comments—I’m always curious about how different twists turn out! Happy baking, and here’s to many cozy, crispy, cheesy tart moments ahead.
Print📖 Recipe
Mushroom Shallot and Herbed Goat Cheese Tarts Recipe

Crispy baked buffalo chicken coated in a crunchy cornflake and parmesan crust, drizzled with a sweet and spicy homemade honey buffalo sauce, topped with fresh green onions and blue cheese or ranch dressing for a flavorful and satisfying meal.
- Prep Time: 15 minutes
- Cook Time: 25 minutes
- Total Time: 40 minutes
- Yield: 4 servings
- Category: Main Dish
- Method: Baking
- Cuisine: American
- Diet: Gluten Free
Ingredients
For the Chicken:
- 6 cups cornflakes (use gluten free if needed)
- ¼ cup grated parmesan cheese
- 1 tablespoon smoked paprika
- 1 teaspoon onion powder
- 1 teaspoon garlic powder
- 2 large eggs, beaten
- 2 tablespoons hot sauce
- 2 pounds chicken breast or skinless thighs
- Extra virgin olive oil, for drizzling
For the Honey Buffalo Sauce:
- ½ cup hot sauce
- 6 tablespoons salted butter
- 1-2 teaspoons seasoned salt
- ¾ teaspoon chipotle chili powder
- ½ teaspoon cayenne pepper
- 2 tablespoons honey
For Serving:
- Blue cheese or ranch dressing
- Sliced green onions
Instructions
- Preheat the Oven: Preheat your oven to 425° F and line a baking sheet with parchment paper to ensure the chicken doesn’t stick and for easy cleanup.
- Prepare the Crumbs: In a food processor, pulse the cornflakes, parmesan cheese, smoked paprika, onion powder, garlic powder, and a pinch of salt until you achieve fine crumbs. If you don’t have a processor, crush the cornflakes in a ziplock bag by stepping on them. Transfer the crumbs into a shallow bowl.
- Coat the Chicken: Beat the eggs in a mixing bowl, then add the hot sauce and stir together. Add the chicken pieces and toss well to coat evenly.
- Bread the Chicken: Dredge each piece of chicken through the prepared crumb mixture, ensuring they are fully coated. For an extra crispy coating, dip the chicken back into the egg mixture and then the crumbs a second time. Place the coated chicken onto the lined baking sheet.
- Drizzle with Olive Oil and Bake: Lightly drizzle extra virgin olive oil over the chicken pieces to help them crisp. Bake in the preheated oven for 20-25 minutes or until the chicken is cooked through and the coating is golden and crisp.
- Make the Honey Buffalo Sauce: While the chicken bakes, melt the butter in a saucepan over medium heat. Add the hot sauce, seasoned salt, chipotle chili powder, and cayenne pepper. Stir until fully combined and melted, then remove from heat and mix in the honey for a perfect balance of sweetness and heat.
- Serve: Drizzle the honey buffalo sauce generously over the baked chicken. Top with sliced green onions and your choice of blue cheese or ranch dressing. This dish pairs wonderfully with rice or french fries for a full meal experience. Enjoy!
Notes
- Use gluten-free cornflakes to make this recipe gluten-free.
- For extra spicy, increase the cayenne pepper or add more hot sauce to the egg mixture.
- If you prefer a thicker crust, double coat the chicken by dipping twice.
- Chicken thighs will be juicier but cook slightly longer than breasts.
- Blue cheese dressing adds a tangy contrast; ranch offers a milder flavor.


Leave a Reply