
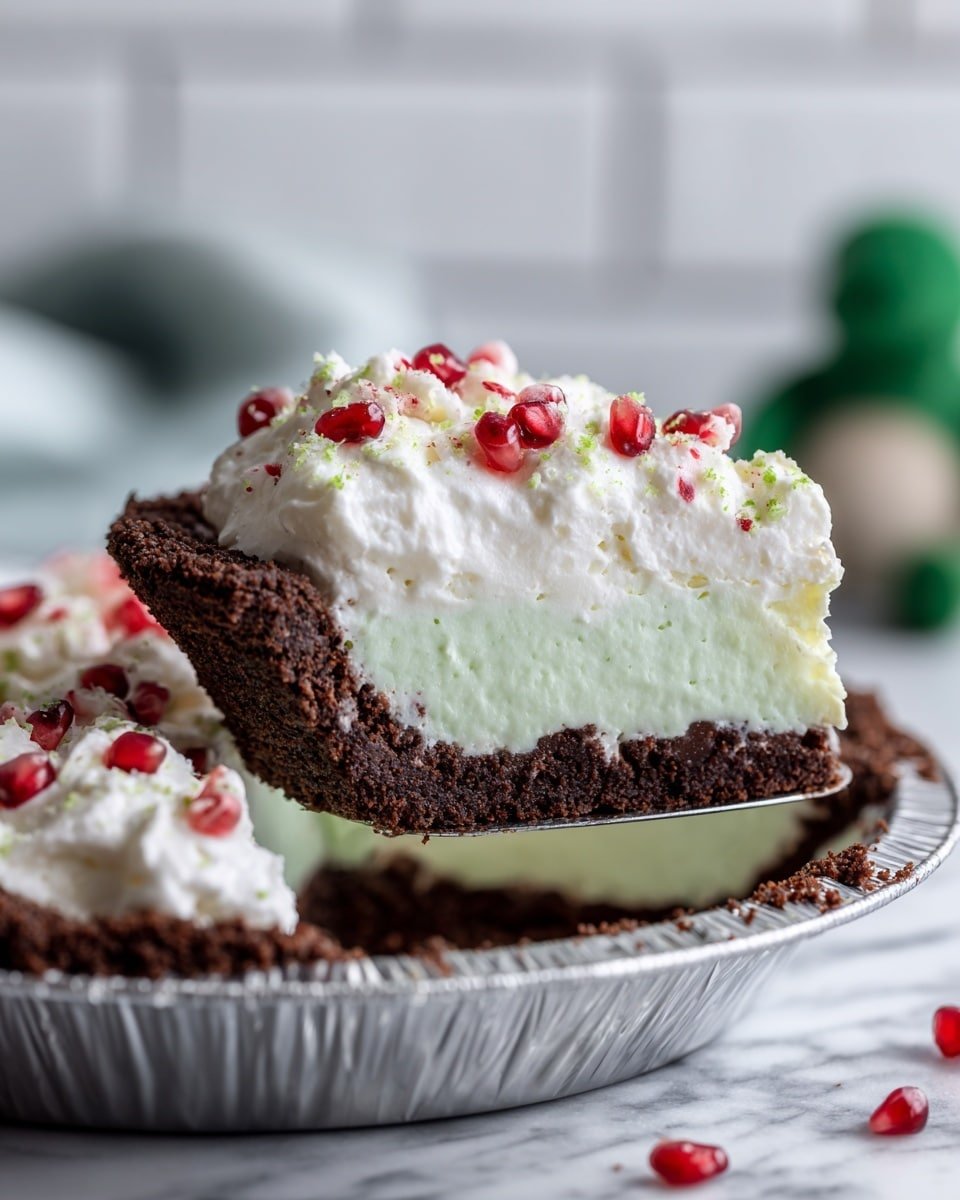
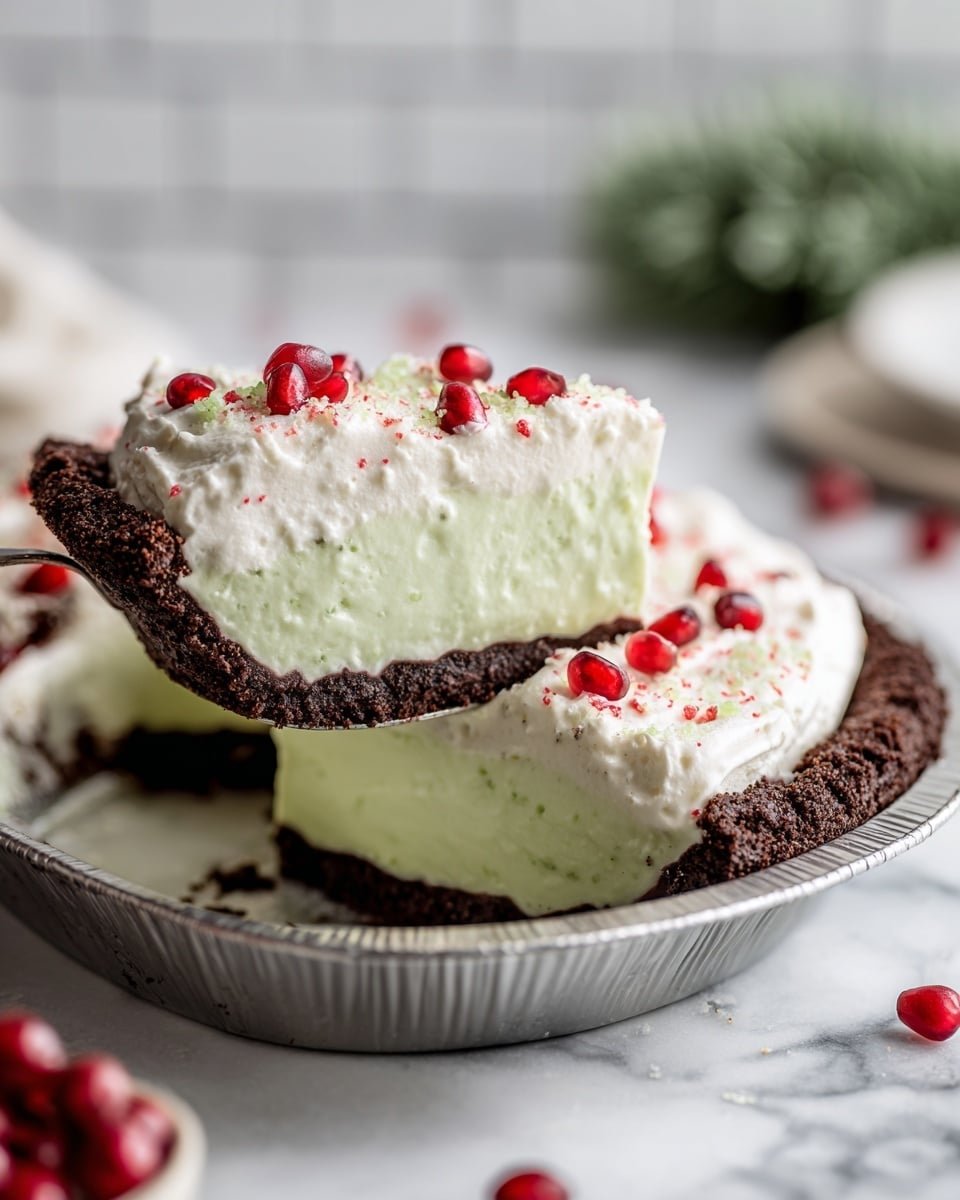
No Bake Grinch Pie Recipe is your go-to festive treat when you want something playful, colorful, and utterly delicious—without turning on the oven. This pie steals the show with its bright green creamy pudding nestled inside a crunchy Oreo crust, decked with cheerful red heart sprinkles. Perfect for holiday parties, cozy family gatherings, or even unexpected celebrations, anyone who loves a light, sweet, and visually fun dessert will adore it. I love how easy it is to whip up, and I’m excited to share every step with you!
Jump to:
What Makes This So Good
This No Bake Grinch Pie Recipe comes together with such a fun pop of color and a creamy texture you can't help but smile at. The contrast between the Oreo crust’s slightly gritty crunch and the smooth, fluffy pudding is irresistible. Plus, because it’s no-bake, you avoid any oven heat in the warmer months or last-minute stress.
- Big Flavor, Minimal Fuss: A quick pudding mix, colorful food coloring, and ready-made crust make this a snap to throw together.
- Family-Friendly: Kids love helping add the sprinkles and popping the red hearts on top—they'll be proud to serve this one!
- Simple Ingredients: With just a handful of pantry staples and minimal prep, you can have this green delight ready in no time.
- Works Any Night: Whether it’s a casual dessert or a holiday centerpiece, this pie is versatile and crowd-pleasing.
Ingredient Guide
Choosing the right ingredients sets you up for pie success! For this No Bake Grinch Pie Recipe, freshness and quality matter, but you don’t need anything fancy. I’ll share some swaps and tips to keep it fun and simple.
- Oreo Pie Crust: The cookie crust adds wonderful chocolatey crunch. Use a store-bought crust to save time or make your own if you're feeling ambitious.
- White Chocolate Pudding Mix (3.9 oz): This is the base of the creamy filling. Using a white chocolate flavor really brightens the taste and pairs perfectly with the green tint.
- 2% Milk (Cold): Cold milk helps the pudding set quickly and gives you that nice creamy texture without heavy richness.
- Cool Whip (½ container): This topping adds extra lightness and a soft texture contrast on top—feel free to substitute with whipped cream if preferred.
- Neon Green & Green Food Coloring: These drops give the pie its signature Grinch-green color—start with a few drops and adjust to get that perfect vibrant shade.
- Green Sanding Sugar & Red Heart Sprinkles: These festive decorations seal the deal, adding sparkle and whimsy that make this pie party-ready.
Quick Reminder: Full measurements are in the recipe card below.
How to Make No Bake Grinch Pie Recipe
Step 1 — Prep & Ready
Before you start mixing, make sure your milk is cold—this helps your pudding set just right. Grab your Oreo pie crust and set it on a flat surface. If you want, peel back the foil carefully to make spreading super easy later. Then gather your food coloring drops because mixing them evenly into the pudding will give that perfect glow. Trust me, seeing that bright green start to come alive is half the fun!
Step 2 — Cook with Confidence
Okay, here’s the fun part where the pudding magic happens. Combine your white chocolate pudding mix with 2 cups of cold milk and add 2-3 drops neon green gel food coloring plus 1-2 drops green food coloring to deepen the shade. Beat everything with an electric mixer until the mixture forms soft peaks—watch for that velvety texture and thickened color, it tells you when it's ready. Then, pour or scoop the pudding into your Oreo crust and smooth it out with a spatula for an even surface. Pop it into the fridge and chill for at least three hours. As it sets, the kitchen fills with a sweet, cozy aroma that always has me checking the fridge early!
Step 3 — Finish & Serve
When your pie has chilled and set perfectly, it’s time to bring it to life with a fluffy topping. Spread the cool whip gently over the green pudding, letting it nestle naturally with soft peaks. Sprinkle your green sanding sugar and mini red hearts all around the top to add sparkle and a festive pop. Just before serving, I love to place one large red heart sprinkle right in the center of each slice—it’s such a simple touch but instantly elevates that joyful holiday feel. Then dig in and bask in all the compliments coming your way!
Extra Helpful Tips
With every No Bake Grinch Pie Recipe I’ve made, a few handy tips have made things smoother and the flavor brighter. I always remind myself to get the pudding mix fully whipped for that perfect creamy texture and not to skip chilling—it really makes all the difference. Here’s what you’ll want to keep in mind for your best pie yet:
- Watch for This Sign: The pudding should be thick enough to hold soft peaks and vibrant green before placing in the crust.
- Temperature Trick: Use really cold milk straight from the fridge for a quicker set and creamier texture.
- Prep-Ahead Option: You can prepare the pudding layer a day in advance; just add cool-whip and sprinkles just before serving for the freshest look.
- Avoid This Common Mistake: Don’t try to rush chilling time—that firm set in the fridge is key to slicing neat, clean pieces.
Serve & Enjoy
Easy Enhancements
If you want to dress up your No Bake Grinch Pie Recipe even more, try adding a drizzle of white chocolate sauce or a sprinkle of crushed peppermint for a minty kick. Fresh mint leaves or tiny edible gold stars bring extra holiday sparkle. For a twist, a splash of vanilla or almond extract in the pudding mix adds warmth and depth without extra fuss.
Tasty Pairings
This pie pairs wonderfully with a cup of hot cocoa or green tea for a cozy touch. Lightly salted nuts or a plate of sliced fresh fruit balance the sweetness perfectly, turning it into a well-rounded dessert experience that keeps everyone coming back for seconds.
Quick Plating Tips
Serve your pie slices on simple white plates to let those green and red colors pop. Adding a few fresh berries or a mint sprig beside each slice instantly upgrades the look. A gentle dusting of powdered sugar or extra sanding sugar on the plate edges gives a snowy holiday vibe without any extra effort.
Store, Freeze & Reheat
Fridge Storage
Your No Bake Grinch Pie Recipe keeps beautifully in the fridge for about 3-4 days. Store it covered tightly with plastic wrap or in an airtight container to prevent it from absorbing other fridge smells. You might notice the crust soften over time, but the filling stays creamy and delicious—still perfect for a sweet treat the next day.
Freezer Friendly?
This pie isn’t the best candidate for freezing because the texture of the pudding and cool whip topping can change and become watery when thawed. If you need to save it longer, try freezing just the crust or an unfilled crust separately and assemble the pudding and toppings fresh when you’re ready to serve.
Reheat Like New
Because this pie is served chilled and is pudding-based, reheating isn’t recommended. Instead, just let slices sit at room temperature for 10-15 minutes if the fridge chill feels too firm. This softens the pudding slightly without losing that fresh-made feel.
No Bake Grinch Pie Recipe FAQs
Absolutely! A graham cracker crust or chocolate wafer crust works well too. Just pick one that holds up in the fridge and complements the sweet pudding flavor.
You can use regular green food coloring, but the color might be less vivid. Adding a small amount of yellow can also help brighten the shade.
Yes! Use a dairy-free pudding mix or homemade pudding alternative, plant-based milk like almond or coconut, and dairy-free whipped topping to keep it friendly for all diets.
The pudding filling needs at least three hours to set properly. Overnight chilling is even better if you want to prep ahead!
Final Flavor Thoughts
I hope this No Bake Grinch Pie Recipe brightens your holiday or any day you choose to make it as much as it does mine. It’s such a joy to see the vibrant green shine on the table and even more fun to hear the “oohs” and “ahhs” from friends and family. If you try it out, please drop a comment or star rating—I’d love to hear if you put your own spin on it! Here’s to sweet moments and easy treats that bring everyone together.
Print📖 Recipe
No Bake Grinch Pie Recipe

This delightful No Bake Grinch Pie combines vibrant green white chocolate pudding set in a crunchy Oreo crust, topped with cool whip and festive red and green sprinkles. Perfect for holiday gatherings, this easy-to-make dessert requires no baking and is visually stunning with its Grinch-inspired theme.
- Prep Time: 15 minutes
- Cook Time: 0 minutes
- Total Time: 3 hours 15 minutes
- Yield: 8 servings
- Category: Dessert
- Method: No-Cook
- Cuisine: American
Ingredients
Crust
- 1 Oreo pie crust
Pudding Filling
- 1 box white chocolate pudding (3.9 oz)
- 2 cups 2% milk (cold)
- 2-3 drops neon green gel food coloring
- 1-2 drops green food coloring
Toppings
- ½ container Cool Whip
- ½ cup green sanding sugar
- ½ cup mini red heart sprinkles
- ½ cup large red heart sprinkles
Instructions
- Prepare Pudding: Beat the white chocolate pudding mix with 2 cups of cold 2% milk, adding 2-3 drops of neon green gel food coloring and 1-2 drops of green food coloring. Continue beating until the mixture sets and forms soft peaks, achieving a vibrant green color.
- Fill Crust: Spoon the prepared pudding evenly into the Oreo pie crust, smoothing the surface with a spatula for an even layer.
- Chill: Refrigerate the pie for 3 hours to allow the pudding to fully set and firm up.
- Add Toppings: Remove the pie from the refrigerator, spread the Cool Whip over the set pudding layer evenly to form a creamy topping.
- Decorate: Sprinkle green sanding sugar and mini red heart sprinkles over the Cool Whip layer. Just before serving, place individual large red heart sprinkles on each slice for a festive finishing touch.
- Serve: Cut the pie into slices and enjoy this fun and colorful no-bake Grinch-themed dessert.
Notes
- Use cold milk to ensure the pudding sets properly and to achieve the best texture.
- Gel food coloring provides a brighter, more vibrant green than liquid food coloring.
- This pie must be refrigerated before serving to allow the pudding to firm up correctly.
- For a dairy-free version, substitute Cool Whip and milk with suitable plant-based alternatives.
- Store leftovers covered in the refrigerator and consume within 2-3 days.


Leave a Reply