
Red Velvet Oreo Cheesecake Recipe is the ultimate decadent dessert that combines the velvety richness of red velvet cake with the creamy indulgence of cheesecake and the crunchy surprise of Oreo cookies. It’s perfect for celebrations, cozy family gatherings, or any time you want to impress with a dessert that tastes as good as it looks. If you’re someone who loves a bit of chocolate, a splash of color, and textures that playfully contrast, you’ll be thrilled with how this cheesecake comes together.
Jump to:
What Makes This So Good
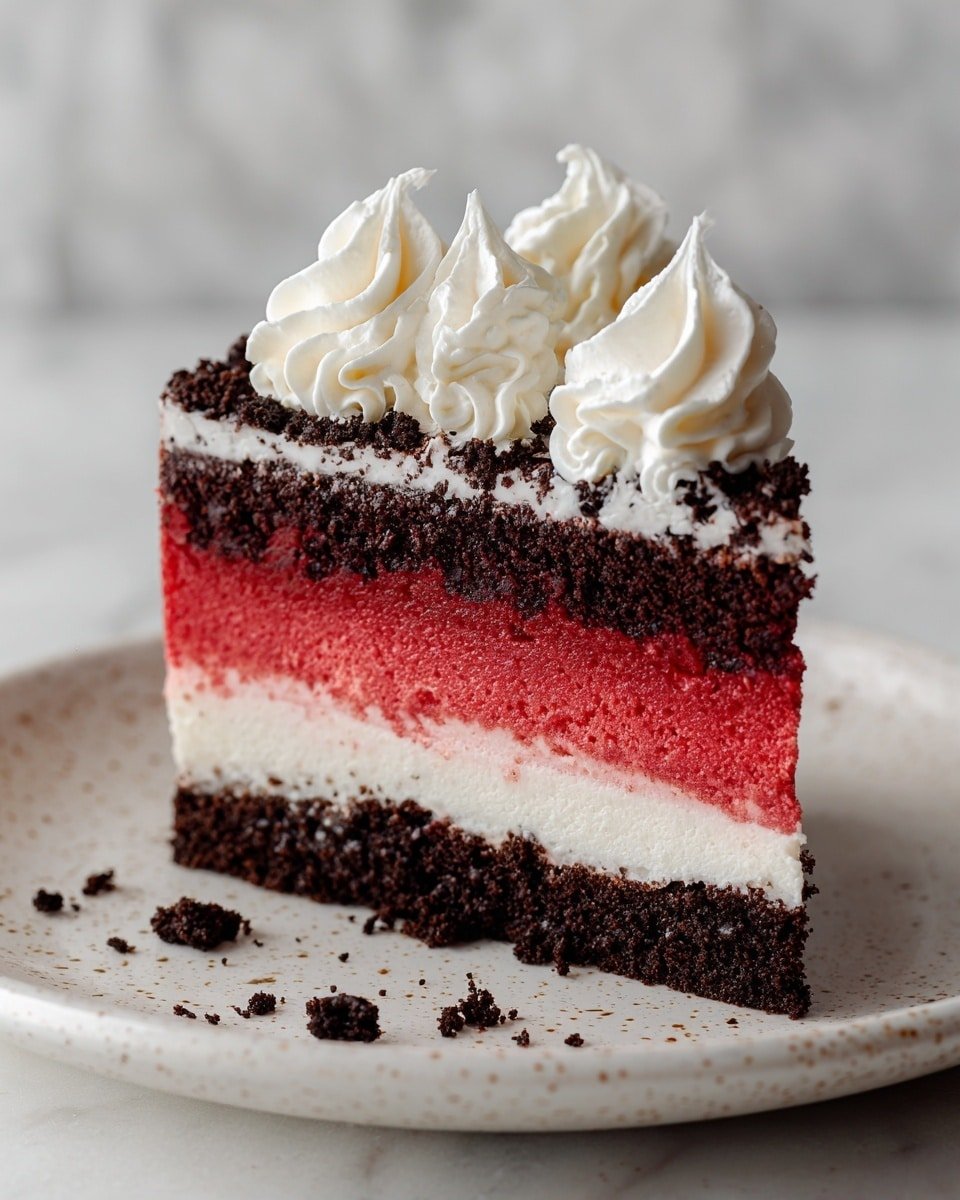
This Red Velvet Oreo Cheesecake Recipe hits all the right notes: a buttery Oreo crust, smooth and lightly tangy cream cheese filling tinted with that iconic red velvet hue, and a cloud of whipped topping crowned with crunchy Oreo bits. Each forkful delivers layers of creamy, chocolatey, and slightly tangy flavors that feel luxurious but never overwhelming.
- Big Flavor, Minimal Fuss: The rich aroma of cocoa paired with the familiar Oreo crunch makes this dessert a guaranteed crowd-pleaser without complicated steps.
- Family-Friendly: Kids and adults alike will swoon over how the bright red color makes this cheesecake party-ready and fun.
- Simple Ingredients: Using everyday ingredients like cream cheese, Oreos, and heavy cream means no special trips to the store.
- Works Any Night: Whether it's a holiday event or just a cozy weekend treat, this cheesecake fits perfectly.
Ingredient Guide

Choosing the right ingredients can be the difference between a good cheesecake and an unforgettable one. Here’s how to make sure your Red Velvet Oreo Cheesecake Recipe shines.
- Oreo Cookies: Use classic Oreos for the iconic flavor and crunch. Crushing them yourself gives a better texture than pre-packaged crumbs.
- Unsalted Butter: Melt it gently to mix into the crust, ensuring even coverage without greasiness.
- Cream Cheese: Bring it to room temperature—this is key for a smooth, lump-free filling.
- Heavy Cream: Cold cream whips up beautifully into stiff peaks, adding lightness to the cheesecake.
- Cocoa Powder: Natural unsweetened cocoa adds that subtle chocolate depth essential for red velvet.
- Red Food Dye: Use gel or paste dye for a vibrant shade without watering down the batter.
- Sour Cream: Adds a soft tang and silkiness; room temperature again helps with smooth mixing.
Quick Reminder: Full measurements are in the recipe card below.
How to Make Red Velvet Oreo Cheesecake Recipe
Step 1 — Prep & Ready
First things first, get your ingredients out so you can prep easily. Crush your Oreos finely but not into powder—think of coarse sand, so you get texture in the crust. Melt the butter slowly—too hot and you risk a greasy crust. Set your cream cheese and sour cream out early; they whip up smoother at room temperature without lumps. And don’t forget to chill your heavy cream in the fridge until you’re ready to whip it—cold cream peaks quicker and fluffier.
Step 2 — Cook with Confidence
Once your crust mixes up, press it evenly into a 9-inch springform pan, going slightly up the sides for that perfect base. Pop it in the freezer while you whip the heavy cream into stiff peaks—this will add lightness later. Then, beat your cream cheese until it’s silky smooth before adding confectioners’ sugar, cocoa, vanilla, sour cream, and food dye. The red color will become vivid and gorgeous. Gently fold in the whipped cream—take your time here so the filling stays airy. Pour it into your crust and smooth the top carefully. Patience is key: chill it overnight for a rich, set cheesecake texture that cuts cleanly.
Step 3 — Finish & Serve
The final flourish is the whipped cream topping mixed with a little sugar, piped around the edges to create delicate swirls. A sprinkle of crushed Oreos on top adds that irresistible crunch and contrast. You’ll notice the satisfying snap when slicing through the crust and the creamy softness that melts in your mouth. Bring it out of the fridge a few minutes before serving so those flavors really come alive.
Extra Helpful Tips
I’ve found that the key to a flawless Red Velvet Oreo Cheesecake Recipe is mindful folding of the whipped cream into the batter and a good chill time. These little steps make your cheesecake light, tender, and beautifully set.
- Watch for This Sign: When whipping your heavy cream, lift the whisk—if the peaks hold their shape without drooping, you’ve got perfect stiffness.
- Temperature Trick: Use room temp cream cheese to avoid lumps; cold cream cheese will create a gritty texture that’s tough to smooth out.
- Prep-Ahead Option: You can prepare the crust and filling a day ahead; just let the cheesecake chill overnight for the best flavor fusion.
- Avoid This Common Mistake: Don’t overmix once you add whipped cream; folding gently preserves the airiness that gives the cheesecake its light texture.
Serve & Enjoy

Easy Enhancements
Try drizzling a bit of chocolate ganache or fresh raspberry sauce over each slice for a tart-sweet balance that highlights the red velvet flavor. Fresh berries or edible flowers can also add a pop of brightness and make it look like a professional masterpiece. If you’re feeling indulgent, a sprinkle of mini chocolate chips in the topping takes the texture up a notch.
Tasty Pairings
A rich, creamy dessert like this pairs beautifully with a cup of strong coffee or a velvety red wine like Pinot Noir. For a non-alcoholic option, try a sparkling berry lemonade to cut through the richness. Light whipped cream alongside fresh fruit keeps the plate refreshing and balanced.
Quick Plating Tips
Serve slices on white plates to showcase the vibrant red interior. Use a sharp, hot knife to cut clean pieces and wipe the blade between cuts to keep edges neat. A dollop of whipped cream on the side or a few Oreo crumbs scattered around the plate adds that little extra touch that makes your presentation photo-worthy.
Store, Freeze & Reheat
Fridge Storage
Keep your Red Velvet Oreo Cheesecake chilled in an airtight container or wrapped tightly with plastic wrap for up to 4–5 days. The texture will remain creamy and luscious, though the crust may soften slightly. For the best experience, serve chilled.
Freezer Friendly?
This cheesecake freezes well—wrap tightly in plastic and foil to prevent freezer burn. Thaw it overnight in the fridge to preserve that creamy texture without sogginess. Avoid thawing at room temperature as condensation can make the crust less crisp.
Reheat Like New
Since this cheesecake is served chilled, reheating isn’t typically needed, but if you want a softer slice, let it sit at room temperature for 15 minutes before serving. Avoid microwaving—it can ruin the texture. You might gently warm a raspberry sauce to drizzle atop for a comforting contrast.
Red Velvet Oreo Cheesecake Recipe FAQs
For the creamiest texture and best flavor, I recommend full-fat cream cheese. Reduced-fat versions can alter the cheesecake’s richness and firmness.
Make sure to press the crust firmly and chill it well before adding the filling. Avoid excess butter, and keep the cheesecake chilled to maintain crust crispness.
Absolutely! Chocolate wafers or Biscoff cookies create unique flavors. Just remember to adjust the butter amount based on cookie texture.
Use gel or paste food coloring instead of liquid dyes, and add it at the right time during mixing to evenly distribute without dilution.
Final Flavor Thoughts
I hope you enjoy making and sharing this Red Velvet Oreo Cheesecake Recipe as much as I do. It’s a dessert that never fails to bring smiles and requests for seconds. If you try it, I’d love to hear your tweaks or how you jazz it up—maybe with a swirl of caramel or a sprinkle of sea salt! Don’t forget to leave a star rating if it became a favorite in your kitchen. Happy baking!
Print📖 Recipe
Red Velvet Oreo Cheesecake Recipe
This Red Velvet Oreo Cheesecake is a luscious, no-bake dessert combining a rich Oreo crust, creamy red velvet-flavored cheesecake filling, and a whipped cream topping with crushed Oreos, perfect for special occasions or indulgent treats.
- Prep Time: 25 minutes
- Cook Time: 0 minutes
- Total Time: 12 hours 25 minutes
- Yield: 12 servings
- Category: Dessert
- Method: No-Cook
- Cuisine: American
Ingredients
Cheesecake Crust
- 2 cups (266 grams) Oreo cookies, crushed
- 1 stick (113 grams) unsalted butter, melted
Cheesecake Filling
- 2 cups (480 ml) heavy cream, cold
- 16 oz (455 grams) cream cheese, room temperature
- ¼ cup (60 grams) sour cream, room temperature
- 2 teaspoons vanilla extract
- 1 cup (113 grams) confectioners' sugar, sifted
- 3 tablespoons cocoa powder
- Red food dye, to desired color
Topping
- 6 Oreos, crushed
- 1 cup (240 ml) heavy cream, cold
- ¼ cup (50 grams) sugar
Instructions
- Prepare the Crust: In a large mixing bowl, whisk the crushed Oreo cookies with melted butter until all crumbs are moistened without dry patches. Press the mixture into the bottom and slightly up the sides of a 9-inch springform pan using a rubber spatula or bottom of a measuring cup. Freeze for 20 minutes to set.
- Make the Whipped Cream: Using a stand mixer with a whisk attachment or handheld electric mixer, whip the cold heavy cream for about 5 minutes until stiff peaks form. Set aside carefully to maintain volume.
- Mix the Cheesecake Filling: In a clean stand mixer bowl fitted with a paddle attachment, beat softened cream cheese on medium speed until completely smooth and lump-free. Add sifted confectioners' sugar, vanilla extract, cocoa powder, sour cream, and red food dye. Mix on medium-high until fully incorporated and smooth.
- Fold in Whipped Cream: Use a rubber spatula to gently fold the whipped cream into the cream cheese mixture, careful not to deflate the whipped cream, ensuring a light and airy filling.
- Assemble and Chill: Pour the cheesecake filling onto the chilled Oreo crust and smooth the top with a small offset spatula. Cover the pan with plastic wrap and refrigerate overnight, preferably 12 hours, to firm up.
- Prepare the Topping: Just before serving, whip the cold heavy cream and sugar together using a hand mixer or stand mixer with a whisk attachment until stiff peaks form.
- Decorate the Cheesecake: Sprinkle the crushed Oreos evenly over the top of the cheesecake. Transfer the whipped cream to a piping bag fitted with a Wilton 1M tip and pipe decorative borders around the cheesecake sides. Remove the sides of the springform pan carefully and serve.
Notes
- Use a kitchen scale for precise ingredient measurements to ensure the best texture and flavor.
- Make sure the cream cheese and sour cream are at room temperature to avoid lumps in the filling.
- Be gentle when folding the whipped cream into the filling to maintain its lightness.
- For a more vivid red velvet color, add red food dye gradually until desired hue is reached.
- Keep the cheesecake refrigerated until serving to maintain firmness and freshness.
- If you don’t have a piping bag, a plastic zip-lock bag with the corner snipped off can be used as an alternative for decorating.


Leave a Reply