
Spring Pea and Mint Salad Recipe is one of those bright, refreshing dishes that instantly transports you to a sunny spring afternoon. Crisp peas, fresh mint, and a zingy dressing come together to create a salad that's light yet satisfying. Whether you’re looking for a perfect side to complement your dinner or a vibrant lunch, this salad will quickly become your go-to. I love making it as soon as spring peas are in season because the flavors feel so alive and fresh—you’ll notice how it wakes up your palate. It’s a hit with anyone who appreciates fresh, garden-inspired flavors, and it’s simple enough to whip up even on busy weeknights.
Jump to:
What Makes This So Good
This Spring Pea and Mint Salad Recipe perfectly balances the natural sweetness of fresh peas with a bright, herbaceous lift from vibrant mint. The texture contrast between tender peas and crunchy add-ins makes every bite delightful. Plus, the dressing is simple but impactful, enhancing the fresh ingredients without overpowering them.
- Big Flavor, Minimal Fuss: Fresh peas and mint bring bold, fresh flavors that require minimal prep and ingredients.
- Family-Friendly: Mild and approachable, even picky eaters tend to love the bright, fresh taste.
- Simple Ingredients: Only a handful of pantry staples and fresh produce needed to make this.
- Works Any Night: Whether as a quick lunch or alongside a stovetop dinner, this salad is versatile.
Ingredient Guide

Picking the right ingredients is key to making your Spring Pea and Mint Salad Recipe truly shine. Using fresh, in-season peas and bright green mint will boost the flavor and texture, so take a moment to select the best you can find. And don’t be afraid to swap in similar herbs or add-ins to suit your taste or pantry!
- Fresh Peas: Choose plump, bright green peas for sweetness; fresh or frozen work, but fresh has that pop of texture.
- Mint: Fresh leaves give a cool, aromatic element—dried won’t have the same brightness.
- Red Onion or Shallot: Adds mild crunch and slight sharpness; soak in cold water first to soften the bite if you like.
- Lemon Juice: Fresh-squeezed is always best for that zesty brightness.
- Olive Oil: Use a good-quality extra virgin for a silky finish and depth.
- Salt & Pepper: Season well to balance and bring out the natural sweetness of the peas and herbs.
- Optional Add-Ins: Crumbled feta, toasted almonds, or radishes can add creaminess, crunch, or color.
Quick Reminder: Full measurements are in the recipe card below.
How to Make Spring Pea and Mint Salad Recipe
Step 1 — Prep & Ready
First things first: rinse your fresh peas and give the mint a gentle wash and dry. If you’re using fresh garden peas, shell them carefully, then blanch in boiling water for about 1-2 minutes until they’re tender-crisp and bright green. This step preserves their lovely color and sweet flavor. Drain and plunge them into ice water to stop the cooking—this keeps them that vibrant pop and fresh bite you’re aiming for. Tear the mint leaves into small pieces to release their oils and aroma. If using shallot or red onion, finely chop and soak in cold water for 5 minutes to mellow the edges, then drain well.
Step 2 — Cook with Confidence
The magic here is mostly in the dressing, which is super quick and effortless. Whisk together fresh lemon juice, olive oil, a pinch of salt, and cracked pepper until smooth. You’ll notice the dressing emulsifies into a silky, tangy sauce that complements the peas perfectly. Toss the chilled peas, mint, and onion in the dressing while everything is still cool—this ensures every bite bursts with fresh flavor and the peas stay crisp. You don’t actually cook the salad beyond blanching; it’s all about mixing the fresh ingredients with care.
Step 3 — Finish & Serve
Once tossed, taste and adjust the seasoning—sometimes a little extra lemon juice or salt can brighten it up beautifully. If you love a bit of texture, add crunchy toasted nuts like almonds or pine nuts, or creamy accents like crumbled feta. Serve immediately for that crisp freshness, or chill for 20-30 minutes if you prefer it slightly cooler and melded. Garnish with a few whole mint leaves or a lemon zest twist to make it feel special. This Spring Pea and Mint Salad Recipe comes together so quickly and looks gorgeous—perfect for impromptu guests or a colorful side to your meal.
Extra Helpful Tips
I find that a good balance in texture and acidity really brings this Spring Pea and Mint Salad Recipe to life, so don’t rush the blanching or skip the ice bath. That’s what keeps the peas tender yet crisp. Also, fresh mint can be quite bold—start with a small amount and add more if you want. It’s easy to overpower the delicate pea flavor otherwise.
- Watch for This Sign: Bright green peas with a slight snap mean perfect doneness.
- Temperature Trick: Serve chilled or at room temperature for best flavor and texture.
- Prep-Ahead Option: Blanch peas and prep dressing a few hours ahead, keep separately chilled, then toss just before serving.
- Avoid This Common Mistake: Don’t overdress the salad—too much dressing can weigh it down and hide the fresh flavors.
Serve & Enjoy

Easy Enhancements
If you want to take this Spring Pea and Mint Salad Recipe up a notch, try sprinkling some crumbled goat cheese or feta over the top for creamy tang. A handful of toasted pine nuts or slivered almonds adds a satisfying crunch. A drizzle of honey in the dressing cuts the lemon’s sharpness for an extra touch of sweetness. Fresh herbs like basil or tarragon make for exciting variations, too.
Tasty Pairings
This salad pairs beautifully with grilled chicken, roasted lamb, or simply alongside warm crusty bread. For seafood lovers, I often serve it with baked lemon herb cod—a wonderful match to the salad’s zing and freshness. A crisp white wine or sparkling water with a splash of lemon makes the perfect beverage companion.
Quick Plating Tips
To make your salad pop visually, serve it on a white plate to really show off the vibrant green. Scatter some fresh mint leaves on top, and add a lemon twist or zest curls for an elegant touch. Using a shallow bowl helps keep the ingredients visible rather than piled up, inviting everyone to dig right in.
Store, Freeze & Reheat
Fridge Storage
You can store your Spring Pea and Mint Salad Recipe in an airtight container in the fridge for up to 2 days. Keep in mind the texture of peas softens over time, and mint loses some brightness, so it’s best enjoyed fresh or within a day. Stir gently before serving again to redistribute the dressing.
Freezer Friendly?
This salad isn’t freezer-friendly due to the fresh peas and herbs losing their texture and flavor upon thawing. I recommend making it fresh or storing only in the fridge to ensure the best experience.
Reheat Like New
Since this salad is best served cold or at room temperature, reheating isn’t necessary. If you want to enjoy it warm, consider gently heating cooked peas separately and tossing with fresh mint and dressing right before eating for that lively flavor.
Spring Pea and Mint Salad Recipe FAQs
Absolutely! Frozen peas are a great option when fresh peas aren’t available. Just thaw and blanch them quickly to restore some of their crispness and brighten their color before mixing into the salad.
Keep leftovers in an airtight container in the fridge and try to eat within 1-2 days for the best texture and flavor. The peas and mint tend to wilt and soften over time.
Yes! Fresh basil, tarragon, or dill can be lovely alternatives or additions, each bringing a unique flavor profile that pairs beautifully with peas.
You can prep most components in advance—blanch peas and whisk dressing—but I recommend keeping them separate until serving to maintain freshness and texture.
Final Flavor Thoughts
I hope you enjoy making this Spring Pea and Mint Salad Recipe as much as I do—it’s such a fresh, uplifting dish that really celebrates spring. If you try it, pop back here and leave a star rating or share a twist you loved. I once added citrus segments for a juicy surprise, and it was a hit! No matter how you enjoy it, this salad brings a lovely brightness any day of the week.
Print📖 Recipe
Spring Pea and Mint Salad Recipe

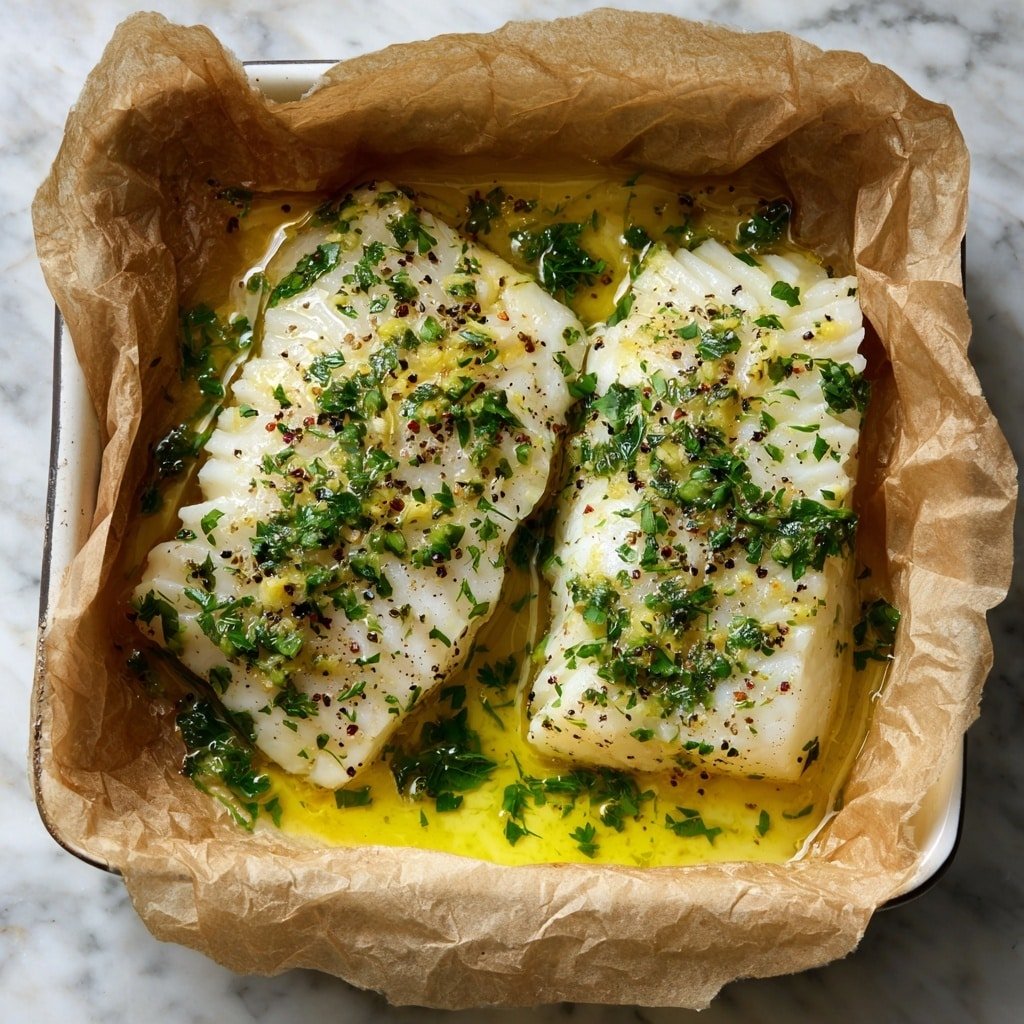
This Baked Lemon Herb Cod features tender, flaky cod fillets infused with bright lemon juice, fragrant herbs, and garlic. It's a simple, healthy, and delicious seafood dish perfect for a quick weeknight dinner or a elegant meal that's ready in under 20 minutes.
- Prep Time: 10 minutes
- Cook Time: 12-15 minutes
- Total Time: 22-25 minutes
- Yield: 4 servings
- Category: Main Course
- Method: Baking
- Cuisine: American
- Diet: Low Fat
Ingredients
Fish
- 4 cod fillets (about 6 oz each)
Marinade
- 2 tablespoons olive oil
- Juice and zest of 1 lemon
- 2 cloves garlic, minced
- 1 teaspoon dried oregano
- 1 teaspoon dried thyme
- Salt and pepper to taste
Garnish
- Fresh parsley, chopped
Instructions
- Preheat Oven: Preheat your oven to 400°F (200°C). Line a baking dish with parchment paper to prevent sticking and for easy cleanup.
- Make Lemon Herb Mixture: In a small bowl, whisk together the olive oil, lemon juice, lemon zest, minced garlic, dried oregano, dried thyme, salt, and pepper until well combined.
- Prepare Cod Fillets: Place the cod fillets evenly spaced in the prepared baking dish. Pour the lemon herb mixture over the fillets, coating them thoroughly to ensure maximum flavor infusion.
- Bake Fish: Bake the cod in the preheated oven for 12-15 minutes, or until the fish turns opaque and flakes easily when tested with a fork, indicating it is fully cooked.
- Garnish and Serve: Remove from oven and garnish with fresh chopped parsley for a burst of color and freshness. Serve immediately for best taste.
Notes
- Ensure cod fillets are of similar size for even cooking.
- Use fresh lemon juice and zest for the brightest flavor.
- Check fish doneness carefully to avoid overcooking and drying out.
- This recipe pairs well with steamed vegetables or a side of rice.
- For a lower sodium option, adjust salt to taste or omit.


Leave a Reply