
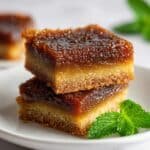
Butter Tart Squares Dessert: A Delicious Twist on a Classic Treat Recipe is the perfect blend of nostalgia and convenience all in one easy dessert. Imagine that classic buttery, sweet tart filling packed into bite-sized squares you can serve any time—whether it’s a cozy family gathering, an impromptu holiday treat, or just a weekend when you want to impress without stress. I love how these squares deliver that signature gooey, caramel-like flavor with a crispy, golden crust that everyone adores. If you’re a fan of traditional butter tarts but want a fuss-free version, this recipe will quickly become a favorite in your kitchen.

Jump to:
What Makes This So Good
This Butter Tart Squares Dessert recipe transforms a beloved Canadian classic into an easy, shareable treat. The magic lies in its gooey, luscious filling paired with a slightly crisp crust — you’ll find the balance of textures incredibly satisfying. Perfect for those moments when you want a cozy, homemade dessert without complicated steps or hard-to-find ingredients.
- Big Flavor, Minimal Fuss: The rich caramel filling simmers into a silky, sweet perfectness that’s easy to whip up with pantry staples.
- Family-Friendly: Whether your kids love raisins or prefer just the classic buttery sweetness, this recipe adapts effortlessly.
- Simple Ingredients: Flour, butter, sugar, and a few basics come together quickly—no exotic items needed!
- Works Any Night: Weeknight dessert or special occasion, these squares are reliably amazing every time you make them.
Ingredient Guide

Choosing the right ingredients can elevate your Butter Tart Squares Dessert: A Delicious Twist on a Classic Treat Recipe from good to absolutely memorable. I’ll walk you through the must-haves and share a few swaps if you’re in a pinch.
- All-Purpose Flour: This forms the base of your crust. Use fresh flour for the best texture.
- Unsalted Butter: Soften or melt according to the step for perfect incorporation. Quality butter adds depth to the flavor.
- Brown Sugar: Choose packed light or dark brown sugar depending on how rich and molasses-y you want your filling.
- Corn Syrup: This helps keep your filling smooth and gooey; light corn syrup works best.
- Eggs: Bring them to room temperature for better mixing.
- Vanilla Extract: Pure vanilla creates a fragrant, comforting aroma you'll notice immediately.
- Raisins or Pecans (optional): A classic nod to traditional butter tarts, but you can skip or swap for your favorite nuts or dried fruits.
Quick Reminder: Full measurements are in the recipe card below.
How to Make Butter Tart Squares Dessert: A Delicious Twist on a Classic Treat Recipe
Step 1 — Prep & Ready
Start by preheating your oven to 350°F (175°C) so it’s ready by the time you’re done prepping. In a medium bowl, whisk together the flour, sugar, salt, and baking powder—mixing dry ingredients now helps prevent clumps later. You’ll want your unsalted butter softened but not melted for the crust; it should be easy to cut into the flour mixture until it looks like coarse crumbs. Press that evenly into your greased 8×8-inch pan—don’t rush this part! A firm, even layer here ensures a sturdy base to hold up to the luscious filling. Pop it into the oven and let it bake until it’s just starting to turn golden, about 15 minutes. Take it out and let it cool for five minutes while you move on to the filling.
Step 2 — Cook with Confidence
Whisk the brown sugar and corn syrup together in a large bowl until smooth and blended—this sweet combo is the heart of your filling, so make sure it’s silky before moving on. Stir in the melted butter, then beat in the eggs and vanilla extract until the mixture looks uniformly glossy. If you like that extra texture and flavor that raisins or pecans bring, fold them in now. You’ll pour this beautiful, amber filling over the warm crust you pulled from the oven. Spread it carefully so each square will have a perfect ratio of gooey to crust. Return the pan to the oven and bake for 25 to 30 minutes. You’ll know it’s done when the edges are bubbling and golden, and the center is just set—if you jiggle it gently, it should barely move.
Step 3 — Finish & Serve
Patience is key here; allow the Butter Tart Squares Dessert: A Delicious Twist on a Classic Treat Recipe to cool completely in the pan on a wire rack. This resting time lets the filling firm up to that perfect gooey-yet-cuttable texture we’re after. When you slice into squares, you’ll notice those crispy edges contrasting wonderfully with the luscious interior—that’s dessert magic at work. Serve them on a pretty plate, maybe with a dollop of whipped cream or a scoop of vanilla ice cream for extra indulgence. I can’t tell you how many compliments I get when these hit the table!
Extra Helpful Tips
I’ve found that little details make all the difference when making Butter Tart Squares Dessert: A Delicious Twist on a Classic Treat Recipe shine in your kitchen. Here are a few nuggets of advice to guide you smoothly through the process and avoid common pitfalls.
- Watch for This Sign: When your filling edges are bubbly and golden but the center is just set, it’s time to pull your squares out of the oven. Don’t overbake or the gooey texture disappears.
- Temperature Trick: Let your eggs warm up to room temp before mixing for a smoother, well-incorporated filling that bakes evenly.
- Prep-Ahead Option: You can prepare the crust and filling separately up to one day ahead—just press and bake the crust, refrigerate, then add the filling and bake next day.
- Avoid This Common Mistake: Don’t skip letting the squares cool fully—cutting too soon can cause a sticky mess and won’t give you those perfect edges.
Serve & Enjoy

Easy Enhancements
Want to add your own touch to Butter Tart Squares Dessert: A Delicious Twist on a Classic Treat Recipe? Try a sprinkle of flaky sea salt on top after they come out of the oven to balance the sweetness. Drizzle a little caramel sauce or warm maple syrup for an extra cozy feel. If you’re a fan of spice, a dash of cinnamon or nutmeg in the filling provides a subtle warmth that’s irresistible. Fresh berries or a dusting of powdered sugar right before serving can also brighten things up beautifully.
Tasty Pairings
These squares are sweet and rich, so they pair wonderfully with a robust cup of coffee or a smooth black tea to balance their sugary depth. For something chilly, vanilla ice cream or a scoop of cinnamon-spiced gelato is an indulgent partner. If you’re thinking beyond beverages, a simple fruit salad with tart berries helps cut through the richness, making a lovely, balanced dessert plate.
Quick Plating Tips
To make your Butter Tart Squares look extra special, arrange them thoughtfully on a rustic wooden board or pretty dessert platter. A light dusting of powdered sugar or cocoa powder adds a pretty snowy effect. Nestle a small sprig of fresh mint or a twist of lemon zest alongside each square—it’s a simple touch that impresses guests. If serving with ice cream or cream, drizzle some sauce artistically across the plate.
Store, Freeze & Reheat
Fridge Storage
Butter Tart Squares keep well covered in an airtight container in the fridge for about 4 to 5 days. You’ll notice the crust softens slightly, though it still tastes delicious. Storing them cold helps maintain that rich, gooey texture in the filling without becoming overly sticky or messy.
Freezer Friendly?
Good news—you can freeze Butter Tart Squares Dessert: A Delicious Twist on a Classic Treat Recipe! Wrap individual squares tightly in plastic wrap, then store them in a sealed freezer bag or container for up to 2 months. Thaw overnight in the fridge to avoid sogginess, and if needed, warm slightly to bring back that fresh-from-the-oven feel.
Reheat Like New
To revive your squares, reheat gently in a preheated 325°F oven for about 8–10 minutes. This keeps the crust crisp and the filling melty without drying out. If pressed for time, a quick 15–20 second zap in the microwave can work, but watch closely so they don’t become chewy. I find oven reheating brings out the best aroma and texture, making leftovers feel freshly baked.
Butter Tart Squares Dessert: A Delicious Twist on a Classic Treat Recipe FAQs
Absolutely! You can leave out raisins or pecans if you prefer a classic smooth filling. The squares still turn out rich and delicious, and you can always add other mix-ins like chocolate chips or dried cranberries if you like.
Corn syrup helps keep the filling smooth and prevents crystallization, so your Butter Tart Squares have that perfect gooey, glossy texture rather than becoming grainy or crystallized.
An 8×8-inch pan is ideal to achieve the right thickness for these squares. If you use a larger pan, the squares will be thinner and bake faster, so watch your time closely. A smaller pan will need longer baking and result in thicker squares.
Look for golden edges and a filling that’s set but still slightly jiggly in the center. When you gently shake the pan, it should wobble a bit but not be liquid. This ensures the gooey texture without being runny.
Final Flavor Thoughts
I hope you enjoy making and sharing this Butter Tart Squares Dessert: A Delicious Twist on a Classic Treat Recipe as much as I do. It’s a wonderful way to capture the essence of a beloved classic with less mess and fuss. If you try it, I’d love to hear how it turned out — maybe you’ll sprinkle a little sea salt or try pecans instead of raisins next time! Don’t forget to rate the recipe and drop a comment below to share your favorite variation. Happy baking, friend!
Print📖 Recipe
Butter Tart Squares Dessert: A Delicious Twist on a Classic Treat Recipe
Butter Tart Squares combine the luscious, gooey filling of classic butter tarts with a convenient square shape, perfect for serving as a delightful dessert or snack. This easy-to-make treat features a buttery crust topped with a rich filling made from brown sugar, corn syrup, and a hint of vanilla, with optional raisins or pecans for added texture and flavor.
- Prep Time: 15 minutes
- Cook Time: 40-45 minutes
- Total Time: 1 hour
- Yield: 16 squares
- Category: Dessert
- Method: Baking
- Cuisine: Canadian
Ingredients
Crust
- 1 cup all-purpose flour
- ½ cup unsalted butter, softened
- ¼ cup granulated sugar
- ¼ teaspoon salt
- ¼ teaspoon baking powder
Filling
- 1 cup brown sugar, packed
- ½ cup corn syrup
- ¼ cup unsalted butter, melted
- 2 large eggs
- 1 teaspoon vanilla extract
- ½ cup raisins or pecans (optional)
Instructions
- Preparing the Crust: Preheat your oven to 350°F (175°C). In a medium mixing bowl, combine the all-purpose flour, granulated sugar, salt, and baking powder. Whisk them together until the ingredients are well mixed. Add the softened butter and mix until the mixture resembles coarse crumbs. Press this mixture evenly into the bottom of a greased 8×8-inch baking pan. Bake the crust for 15 minutes or until it turns lightly golden.
- Preparing the Filling: While the crust bakes, in a large bowl, combine the brown sugar and corn syrup, stirring until blended thoroughly. Add the melted butter, then whisk in the eggs and vanilla extract until the mixture is smooth and uniform. If you desire, fold in raisins or pecans for extra texture and flavor.
- Assembling the Butter Tart Squares: Remove the crust from the oven and allow it to cool for about 5 minutes. Pour the prepared filling over the warm crust and spread it evenly across the surface. Return the baking pan to the oven and bake for a further 25 to 30 minutes until the filling is set and the edges appear golden brown.
- Cutting and Serving: After baking, let the butter tart squares cool completely in the pan on a wire rack. Once cooled, cut into even squares and serve as a delicious dessert or snack.
Notes
- For a nut-free version, omit the raisins or pecans.
- Ensure the crust is baked until lightly golden for the best texture.
- Cooling the bars completely is important to help the filling set properly before cutting.
- You can substitute corn syrup with maple syrup or honey for a different flavor, but the consistency may vary.
- Store leftovers in an airtight container at room temperature for up to 3 days or refrigerate for up to a week.


Leave a Reply